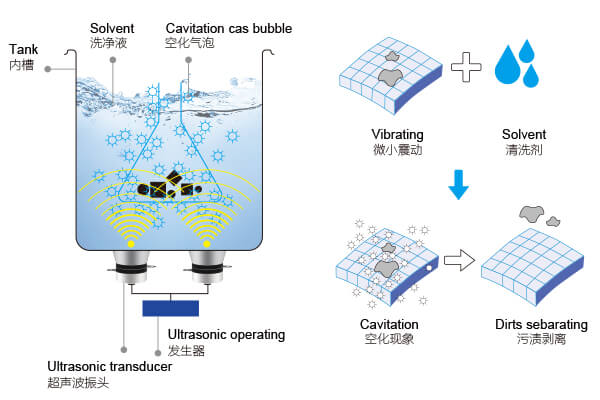
Ultrasonic cleaning offers a remarkably efficient way to remove dirt, grease, and microscopic contaminants from even the most intricate surfaces—without the need for harsh chemicals or abrasive scrubbing. At its core, this technology relies on high-frequency sound waves that generate microscopic bubbles in a liquid medium. These bubbles rapidly collapse in a process called cavitation, releasing intense energy that gently lifts contaminants from every crack and crevice of the object being cleaned.
Whether you’re working with jewelry, electronic components, precision tools, or delicate lenses, ultrasonic cleaning delivers a level of cleanliness that’s difficult to achieve by hand. And despite its high-tech reputation, the underlying physics are elegantly simple—making it an ideal concept for curious minds and DIY enthusiasts alike.
The Science Behind Cavitation
At the heart of every ultrasonic cleaner is the phenomenon called cavitation. This occurs when high-frequency sound waves pass through a liquid and create tiny bubbles, which then collapse violently. These collapses release localized bursts of energy that can dislodge dirt, oil, oxidation, and other contaminants from surfaces.
The Principle Behind Ultrasonic Cleaning
Imagine tiny vacuum pockets forming and bursting thousands of times per second. That’s cavitation in action, and it’s what gives ultrasonic cleaning its edge—especially for objects with tiny crevices or delicate surfaces.
Why Ultrasonic Cleaning Is Effective
Unlike traditional cleaning methods that rely on friction or harsh chemicals, ultrasonic cleaning reaches every nook and cranny. Whether you’re cleaning jewelry, circuit boards, or surgical tools, the uniform distribution of cleaning action offers a distinct advantage.
Moreover, ultrasonic cleaning is non-contact. That means no brushes or abrasives touch your items—making it ideal for sensitive materials like precious metals, lenses, and even biological specimens in laboratories.
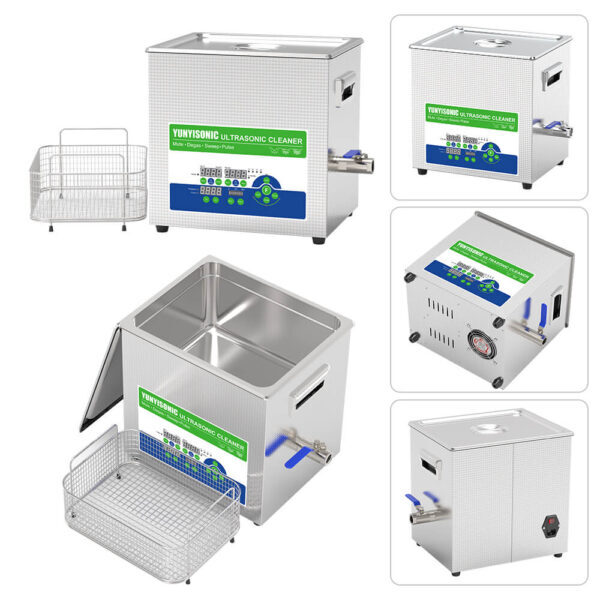
ultrasonic cleaner
Common Applications You Might Not Know
Most people associate ultrasonic cleaners with jewelry stores or dental offices, but their use goes much further. In fact, you’ll find them in:
- Watch repair shops for cleaning gears and pivots
- Laboratories for glassware and metal instruments
- Automotive workshops for carburetors and fuel injectors
- Electronics labs for printed circuit boards
- Hobbyist workbenches for coins, shells, and model parts
This versatility explains why so many people are curious about building their own version at home. And it’s more achievable than it sounds.
From Low to High Frequency (20kHz–200kHz) A Practical Guide to Ultrasonic Applications
Can You Really Build an Ultrasonic Cleaner at Home?
At first glance, an ultrasonic cleaner may seem like a complex machine only engineers could build. But in reality, the fundamental components are surprisingly accessible, especially if you enjoy tinkering.
DIY vs Commercial Cleaners: What’s the Real Difference?
A factory-made ultrasonic cleaner comes as a polished, calibrated unit. It often includes built-in heating, degassing modes, automatic timers, and multiple frequency options. On the flip side, a DIY ultrasonic cleaner focuses on simplicity. You’ll be aiming for functionality over finesse—good enough to clean everyday objects, not for high-precision industrial use.
What you trade in features, however, you gain in understanding. Building one teaches you the actual working principles rather than treating the machine like a black box. And that knowledge can be just as valuable.
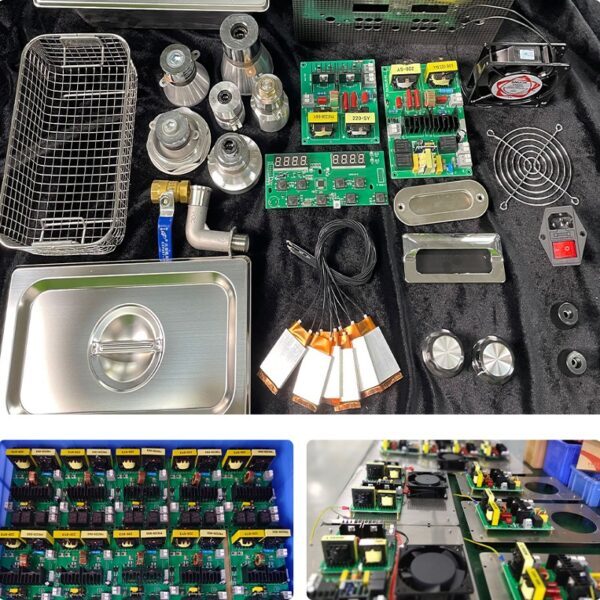
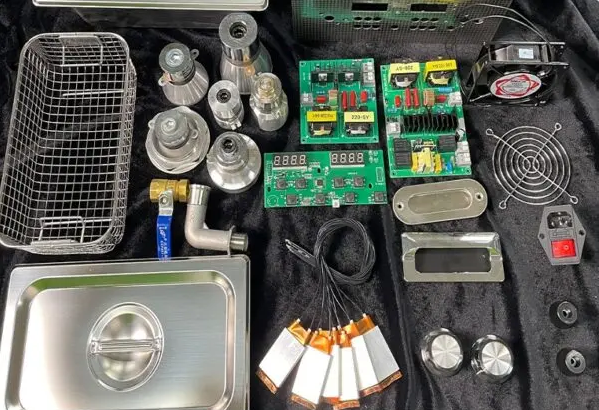
Full DIY ultrasonic cleaner parts package including transducers, drive boards, heater elements, control knobs, wiring, and accessories
What Makes a Cleaner “Ultrasonic”?
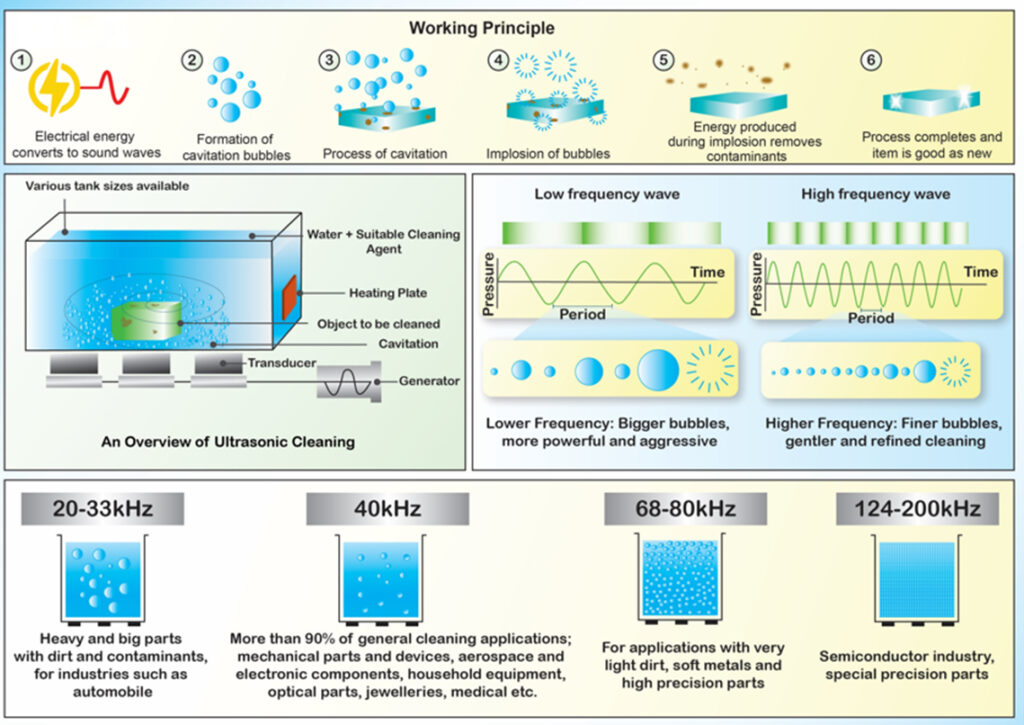
The “ultrasonic” part refers to sound waves above 20kHz—frequencies beyond the range of human hearing. To be effective for cleaning, most commercial ultrasonic cleaners operate between 28kHz to 80kHz, with 40kHz being the most common sweet spot for general-purpose cleaning.
Your goal with a homemade unit should be to reach this frequency using a suitable ultrasonic transducer and signal generator, paired with a liquid container. If those core elements are present and properly calibrated, you’re already well on your way.
Core Components Needed for a Basic Ultrasonic Cleaner
To build an ultrasonic cleaner that actually works, you need more than just enthusiasm. Let’s walk through the essential components, how they work, and what to watch out for.
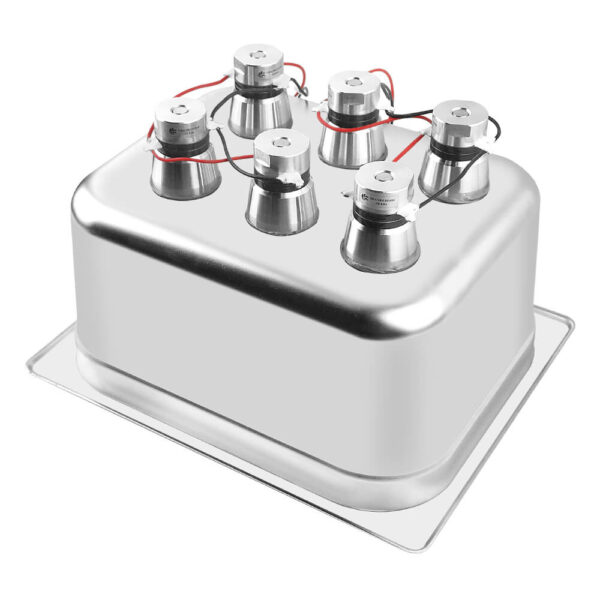
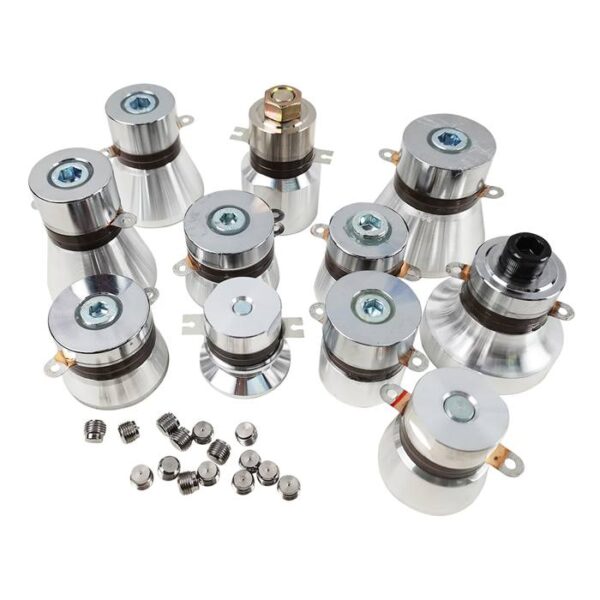
Ultrasonic Transducer: What It Does and Where to Get One
The ultrasonic transducer is the workhorse of your cleaner. It converts electrical signals into high-frequency mechanical vibrations. These vibrations then propagate through the cleaning liquid, creating cavitation bubbles.
There are two common types of transducers used in DIY builds:
- Piezoelectric Transducers – The most common choice. They use ceramic disks that deform when voltage is applied. You’ll often find them in household appliances and even in old humidifiers.
- Magnetostrictive Transducers – Rare in DIY setups due to cost and complexity.
For simplicity, piezo-based transducers are your best bet. You can purchase them pre-mounted on stainless steel plates or as separate disks on platforms like AliExpress, eBay, or specialized electronics suppliers.
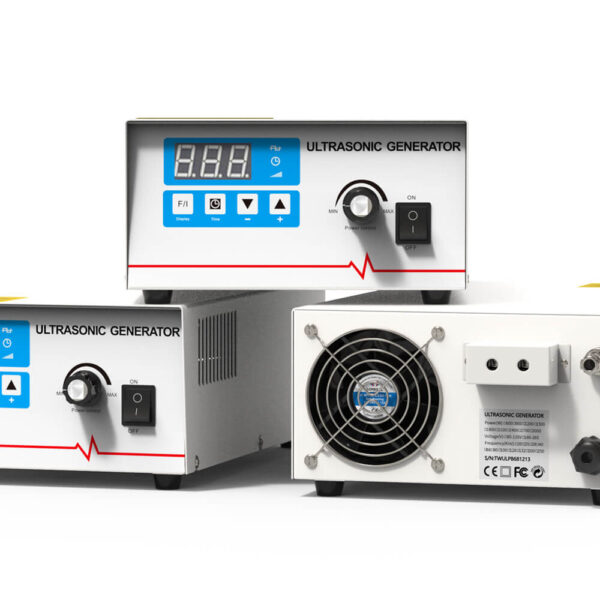
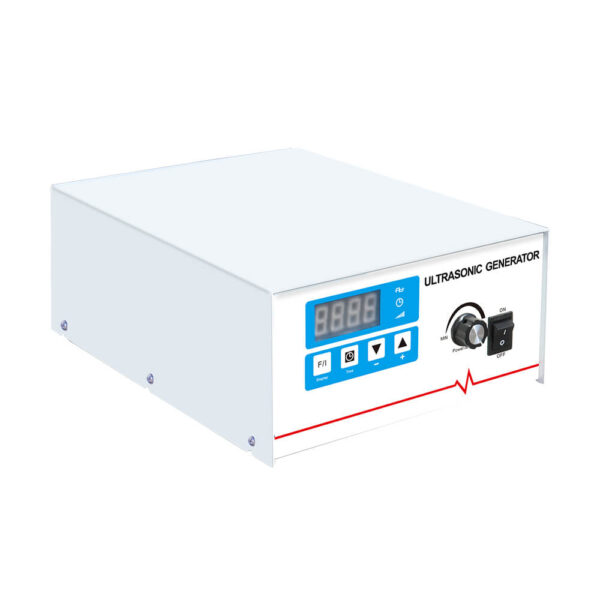
Function of the Generator or Oscillator
To drive the transducer, you need an ultrasonic generator or signal oscillator. This component sends alternating current at the desired frequency (e.g., 40kHz) to power the transducer.
For home projects, you might use:
- A function generator module, powered by DC, which outputs sine or square waves at a set frequency
- Or a prebuilt driver board, often bundled with transducers for ultrasonic cleaning
Make sure to match the generator to your transducer’s specifications—especially frequency and wattage.

The Cleaning Tank: Why Material Matters
The tank serves as the container that holds both your cleaning liquid and the object you want to clean. Most professional units use 304 or 316 stainless steel because it resists corrosion and efficiently transfers ultrasonic energy.
For DIY purposes, a stainless steel food container or an old cooking pot can do the trick. Avoid plastic—it absorbs the vibrations instead of transmitting them, drastically reducing cleaning effectiveness.

Power Supply Requirements and Safety Notes
You’ll likely need a 12V to 48V power supply, depending on your generator board. A DC power brick from an old laptop or printer can often be repurposed.
Important: Always be cautious when working with AC-to-DC conversion. Make sure your setup is properly insulated, and don’t operate the unit when your hands or the bench are wet.
If you’re not confident around electricity, consider asking an electrician to check your build before plugging it in.
Optional Enhancements: Heating, Timer, and More
Many ultrasonic cleaning tasks benefit from warm liquid—usually around 50–60°C (122–140°F). Adding a heating pad beneath the tank or using a double boiler technique can improve performance.
You can also enhance usability with:
- A simple digital timer switch
- Thermal cutoff to prevent overheating
- Rubber damping feet to minimize noise
These extras aren’t mandatory, but they’re nice quality-of-life additions that bring your homemade unit closer to commercial standards.
Home ultrasonic cleaner diy
Building Your DIY Ultrasonic Cleaner Step-by-Step
With the components ready and the science in your pocket, it’s time to put everything together. Building a homemade ultrasonic cleaner isn’t a weekend project for everyone, but if you’re comfortable with basic wiring, soldering, and following safety practices, it’s surprisingly doable.
Step 1: Choosing the Right Container
Start with the tank, because everything else will revolve around it. Your container must be:
- Rigid and metallic, preferably stainless steel
- Deep enough to submerge your objects with at least 2–3 inches of solution above them
- Compatible with your transducer size
Old steel rice cookers, soup bowls, or even camping cookware work well. Just make sure it has a flat bottom surface if you’re mounting a transducer from below.
Clean the container thoroughly before proceeding. Any grease, rust, or dirt can interfere with transducer bonding.
Step 2: Installing the Ultrasonic Transducer
Next comes the delicate part—attaching the transducer.
If you’ve purchased a transducer plate, it’s typically epoxied or clamped to the underside of the tank. Some models come with pre-mounted plates that only need to be secured tightly.
If you’re working with bare piezo disks, apply thermally conductive epoxy between the disk and the steel tank bottom. Then apply light pressure and allow it to cure completely. Make sure the ceramic side faces outward.
Tip: Avoid using hot glue—it lacks the thermal and acoustic conductivity required for ultrasonic performance.
Before mounting, confirm the polarity of the transducer leads and label them clearly for the wiring step.
Step 3: Connecting to a Signal Generator
With the transducer in place, it’s time to connect it to your ultrasonic driver or oscillator.
Double-check the following before connecting:
- Your generator frequency matches the transducer (e.g., both are 40kHz)
- Voltage output is within safe limits (not exceeding the transducer’s rating)
- Power supply is unplugged during setup
Solder or clamp the wires to the transducer terminals and connect the other end to your driver’s output. Route wires neatly to avoid contact with the cleaning fluid or tank walls.
Some DIYers enclose the electronics in a small project box to protect from splashes and static. Make sure there’s ventilation for heat dissipation if your driver generates warmth during use.
Step 4: Sealing and Securing the Setup
Your DIY ultrasonic cleaner might work fine with parts loosely placed, but for safety and longevity, it’s worth securing everything:
- Use thermal paste or epoxy to bond the driver board to a heat sink
- Use rubber spacers or feet under the container to isolate vibration
- Keep wires tied back using zip ties or cable clips
- Mount the switch (if you add one) on a plastic or wood housing away from moisture
Optional: Add a plastic splash shield around the perimeter of the tank to keep water from reaching your circuit area.
Step 5: Initial Power-On Testing and Troubleshooting
With everything in place, it’s time for the first test. But hold off on dropping in your valuables—start slow.
- Add plain distilled water to the tank, enough to cover your intended cleaning zone.
- Plug in the power supply and turn on the generator.
- Look for signs of cavitation:
- You should see fine ripples or mist on the water surface.
- A gentle buzzing or hissing noise (barely audible) is normal.
- Tiny bubbles may form and burst visibly.
If nothing happens, turn off the device and troubleshoot:
- Check power continuity and polarity
- Make sure the transducer is firmly bonded
- Confirm frequency output from your generator
- Inspect solder joints for cold or broken connections
Warning: Never run the transducer dry (without liquid), as it may overheat and fail quickly.
Step 6: Filling with Solution and Test Cleaning
Once you confirm the unit is cavitating, prepare a safe cleaning solution. For basic tests, distilled water plus a small amount of dishwashing liquid is sufficient.
Drop in a small metal object like a bolt or a ring. After a few minutes, you should see:
- Loosened grime settling at the bottom
- A shine returning to the object’s surface
- Slight cloudiness in the solution from suspended contaminants
Avoid placing plastic items, electronics, or delicate materials in the tank until you’re sure your setup runs smoothly and doesn’t overheat.
For better results, try heating the water externally or placing your tank inside a larger warm water bath (double boiler style).
What Cleaning Solution Should You Use in a DIY Ultrasonic Cleaner?
The liquid you use is just as important as the hardware. Without the right solution, even the most powerful ultrasonic cleaner won’t perform as expected.
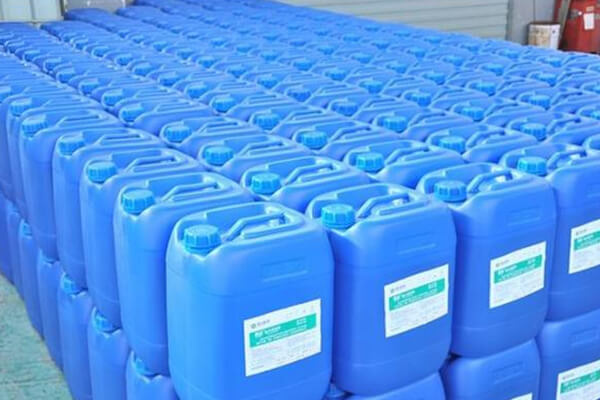
Cleaning agent
Safe Household Alternatives
If you don’t have access to professional cleaning concentrates, don’t worry. There are effective alternatives:
- Distilled water as a base (to avoid mineral spots)
- A few drops of dish soap for cutting grease
- A splash of white vinegar for removing mineral buildup
- Baking soda solution for mild abrasion and stain removal
Make sure to mix gently and avoid foaming. Bubbles from soap can interfere with cavitation.
Why Tap Water Is Not Ideal
Tap water contains minerals, chlorine, and impurities that can:
- Reduce cavitation efficiency
- Leave residues on your cleaned items
- Corrode your transducer over time
Always use distilled or deionized water when possible, especially if your items are made of aluminum, brass, or other reactive metals.
Additives to Enhance Cleaning Power
Depending on what you’re cleaning, certain additives can boost performance:
- Isopropyl alcohol (diluted): Cuts oils, ideal for electronics (if cleaned indirectly)
- Ammonia: Effective for heavy grease but must be used in a well-ventilated space
- Commercial ultrasonic detergents: Some are available online for specific uses like jewelry or optics
Caution: Never mix acids with alcohols or ammonia. Always check chemical compatibility, and never operate your cleaner near open flames or in unventilated areas.
Limitations of Homemade Ultrasonic Cleaners
It’s easy to get excited about building your own ultrasonic cleaner, especially once you see it working for the first time. But as impressive as the results can be, there are important limitations to understand—both in terms of performance and safety.
Power and Frequency Constraints
One of the main drawbacks of DIY ultrasonic cleaners is limited power output and frequency accuracy. Commercial ultrasonic machines are carefully tuned to operate within tight tolerances, delivering stable frequencies and enough wattage to clean effectively without damaging items.
Your homemade version may struggle in a few areas:
- Inconsistent cavitation due to low power (often under 50W)
- Unstable frequency drift, especially if using a generic oscillator
- Hot spots or dead zones where cavitation doesn’t reach
- Inability to clean dense items like carburetors or tools with hardened grease
This doesn’t mean your cleaner is ineffective—it just means it’s best suited for lighter jobs like jewelry, glasses, or small parts.
Safety Hazards and Electrical Risks
Homemade devices rarely go through rigorous testing. That’s why electrical safety should always be top of mind:
- Poorly insulated wiring could lead to short circuits
- Exposure to water may cause electrical shock if components aren’t sealed
- Transducers operating without proper thermal protection could overheat and fail
- Unregulated power supplies might create voltage spikes
To mitigate risks:
- Always operate the unit in dry conditions
- Use fused power supplies with voltage regulation
- Keep a fire extinguisher nearby if working with high-current components
- Never leave the device running unattended
Even if your unit looks and feels safe, never assume it’s as protected as a store-bought appliance. Respect the power behind it.
Longevity and Performance Differences
Ultrasonic transducers are rated for thousands of cleaning cycles, but cheap ones often wear out quickly—especially if bonded with subpar adhesives or overdriven with incorrect voltage.
You may notice:
- A gradual decrease in cavitation over time
- Buzzing or clicking sounds indicating mechanical failure
- The tank becoming hot unusually fast, pointing to inefficiencies
This is especially common with DIY units operating without thermal cutoffs or temperature monitoring.
If your cleaner begins underperforming, it’s often better to rebuild or replace the faulty component rather than trying to push it further.
Realistic Expectations for DIY Users
At the end of the day, a DIY ultrasonic cleaner is a learning tool as much as a cleaning device. It offers hands-on understanding, creative satisfaction, and functional performance within limits.
Expect it to:
- Clean lightly soiled items
- Work well with jewelry, glasses, keys, watch bands
- Be a good backup device for infrequent use
But don’t expect it to:
- Deep-clean complex mechanical components
- Handle long, continuous operation
- Match the quiet, efficient performance of high-end lab models
If you approach your DIY project with the right mindset, you’ll be impressed with what it can do—and you’ll also recognize when it’s time to scale up.
Practical Use Cases for a Simple Ultrasonic Cleaner
Now that you know what a homemade ultrasonic cleaner can handle, let’s explore where it shines. You might be surprised by how often you’ll find yourself reaching for it once it’s built.
Cleaning Jewelry at Home
One of the most popular uses is for restoring rings, necklaces, and earrings. These items often have tiny crevices where lotion, sweat, and skin oils build up. A few minutes in your DIY ultrasonic cleaner with warm soapy water can make even a dull silver ring sparkle again.
Gold, platinum, and diamonds handle ultrasonic cleaning well. Avoid porous stones like opal, turquoise, or pearls, as they can be damaged.
Glasses and Optical Lenses
If you wear glasses, you know how fast they accumulate smudges and skin oil. Ultrasonic cleaning can lift dirt from both the lenses and frame hinges—something manual wiping often misses.
Use a mild solution and avoid lenses with anti-glare coatings unless you’re sure they’re compatible.
Small Tools and Hobby Items
From screwdrivers to coins to watch parts, ultrasonic cleaning is ideal for:
- Modeling and miniature painting tools
- Sewing machine parts
- Mechanical pencil tips or nibs
- Razor heads and beard trimmers
You’ll be amazed at what comes out of the cracks—even in items you thought were already clean.
Electronics (With Precautions)
Certain electronics like circuit boards, PCB modules, and soldered assemblies can be cleaned ultrasonically, but only under strict conditions.
- Use deionized water or isopropyl alcohol
- Never clean while powered or connected
- Dry completely using compressed air or an oven at low temperature
- Avoid components sensitive to vibration like quartz crystals or MEMS sensors
Many professionals clean PCBs this way, but proceed only if you’re confident you can re-dry and re-test safely.
Maintenance Tips for Your DIY Ultrasonic Cleaner
To keep your homemade device performing at its best, regular maintenance is essential. Without proper care, efficiency drops and component life shortens quickly.
How Often to Change Solution
Replace your cleaning solution every few cycles, or sooner if it becomes:
- Cloudy
- Oily
- Smelly
- Full of visible sediment
Stagnant water can corrode the transducer and contaminate your cleaned items. Dump the old liquid, rinse the tank, and refill with fresh solution.
If cleaning oils or greases, wipe the tank with a paper towel between uses to prevent buildup.
Checking for Component Fatigue or Damage
Once every few uses, inspect the following:
- Wiring connections for signs of wear or corrosion
- Transducer adhesion for gaps or bubbles
- Circuit board for heat damage or discoloration
- Tank surface for pitting or leaks
If your transducer begins to buzz louder than normal or you notice a drop in cavitation, it’s time to investigate or replace the part.
Cleaning the Transducer and Tank Properly
Never scrub the tank with abrasives. Instead, use:
- Warm soapy water and a soft sponge
- Vinegar solution for removing mineral deposits
- Cotton swabs for hard-to-reach areas
Avoid using sharp objects near the transducer mounting point, as damage here can dramatically affect performance.
A clean tank = efficient cavitation. Don’t skip this step.
When It’s Time to Upgrade to a Commercial Model
For many DIYers, a homemade ultrasonic cleaner is a satisfying and functional solution. But there often comes a point where the limitations start to interfere with your goals. Understanding when to step up to a commercial-grade unit can save you time, frustration, and even money in the long run.
Signs Your DIY Unit Is Reaching Its Limit
While basic tasks like cleaning rings or keys might always be manageable, there are several clear indicators that your homemade cleaner is no longer sufficient:
- Inconsistent or weak cavitation, even after cleaning and inspection
- Excessive noise or vibration from the tank
- Overheating, especially after short runs
- Failure to clean items thoroughly, despite longer cleaning cycles
- The need to clean larger or more complex items like bike parts, tools, or lab glassware
As your usage becomes more frequent or professional, these issues become more than minor annoyances—they begin to affect your workflow or results.
What Features Matter in a Store-Bought Cleaner
When moving up to a commercial ultrasonic cleaner, focus on features that directly solve your current limitations:
- Stable, calibrated frequency (usually 40kHz for general use)
- Power control, allowing you to adjust intensity for different tasks
- Heating elements to boost cleaning performance
- Degas mode to remove trapped air from the solution
- Sweep frequency function to prevent standing waves and dead zones
- Timer settings for repeatable cycles
- Large tank volume for multiple items or bulky tools
If you’re dealing with delicate electronics, scientific equipment, or surgical tools, higher-frequency models (e.g., 80kHz–120kHz) may also be preferable, as they clean gently with less mechanical stress.
You don’t need the most expensive unit—but choosing one that suits your cleaning goals can significantly boost both efficiency and results.
Final Thoughts: Is Building a Simple Ultrasonic Cleaner Worth It?
For those who love building, experimenting, and understanding how things work, building a DIY ultrasonic cleaner is an incredibly rewarding experience. Not only do you walk away with a functional tool, but you also gain a deeper appreciation for the technology behind it.
Educational Value and Cost Savings
From learning about piezoelectricity and oscillation to testing cleaning performance with your own hands, the process offers practical knowledge in physics, electronics, and fabrication. It’s also cost-effective—many people build simple units for under $50, depending on the parts they already have.
If you’re a hobbyist, student, or hands-on learner, the project is well worth your time.
Who Should Try It — And Who Shouldn’t
You’ll enjoy the process if you:
- Have basic experience with wiring and soldering
- Understand electrical safety principles
- Are comfortable troubleshooting minor electronic issues
- Want to clean small items occasionally
You may want to skip the DIY route if:
- You’re working with valuable or fragile items and need precision
- You plan to run cleaning cycles daily or commercially
- You’re uncomfortable working with AC-to-DC circuits
- You need certified equipment for lab or medical use
In those cases, investing in a professionally built ultrasonic cleaner may offer better peace of mind and long-term results.