Glass cleaning represents one of the most successful applications of ultrasonic technology. The short answer is yes, you can safely put most glass items in an ultrasonic cleaner, and the results often exceed what manual cleaning achieves. Glass responds exceptionally well to the cavitation process because of its hard, non-porous surface and chemical stability. Eyeglasses, laboratory equipment, crystal decanters, and countless other glass items emerge from ultrasonic baths sparkling clean with minimal effort.
Understanding which types of glass are suitable and how to clean them properly ensures success and prevents damage. The cavitation bubbles that make ultrasonic cleaning so effective can also cause problems if you ignore basic safety guidelines or push fragile items beyond their limits.
Why Glass Works Well with Ultrasonic Cleaning
The Properties That Make Glass Suitable
Glass possesses several characteristics that make it ideal for ultrasonic cleaning. Its molecular structure creates a completely smooth, non-porous surface at the microscopic level. Unlike porous materials that might absorb cleaning solution or trap air bubbles, glass allows cavitation bubbles to form and collapse directly against contaminated areas. This direct contact maximizes cleaning effectiveness.
The hardness of glass, typically rating between 5 and 7 on the Mohs scale depending on composition, provides excellent resistance to the mechanical action of cavitation. The collapsing bubbles, while powerful enough to dislodge dirt and oils, cannot scratch or damage properly manufactured glass. This durability allows aggressive cleaning without fear of surface degradation.
Chemical stability represents another crucial advantage. Most glass types resist attack from common cleaning solutions, including alkaline detergents, mild acids, and surfactant-based cleaners. This compatibility gives you flexibility in selecting cleaning solutions optimized for the specific contaminants you need to remove. Whether tackling fingerprint oils, mineral deposits, or industrial residues, appropriate cleaning solutions can be used safely with glass.
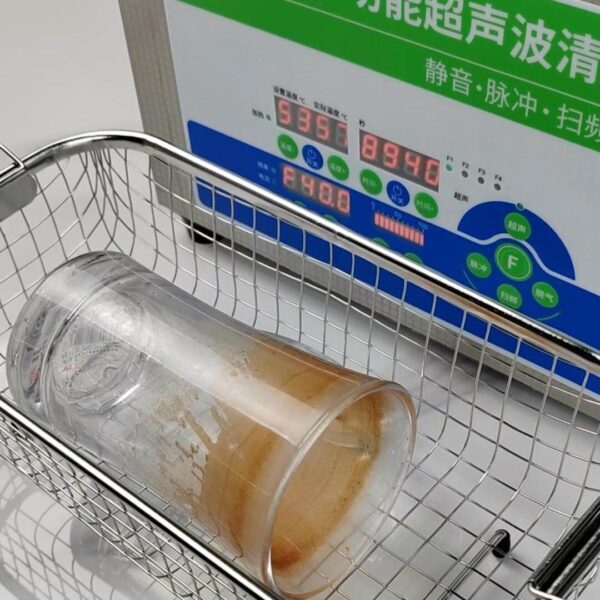
Ultrasonic Cleaner Removing Stubborn Tea Stains From Cup Glassware
How Cavitation Interacts with Glass Surfaces
The ultrasonic waves traveling through the cleaning solution create alternating high and low-pressure zones. During low-pressure phases, microscopic bubbles form on the glass surface and in the surrounding liquid. These bubbles grow over several acoustic cycles before violently imploding during the high-pressure phase. The implosion generates localized temperatures around 5,000 degrees Celsius and pressure spikes exceeding 10,000 PSI, though these extreme conditions exist only momentarily in microscopic regions.
For glass cleaning, this cavitation process provides scrubbing action at millions of points simultaneously. The bubbles form preferentially at contaminated sites where oils, dirt, or mineral deposits disrupt the smooth glass surface. As they collapse, they blast away these contaminants with remarkable efficiency. The cleaning action reaches into crevices, scratches, and textured areas that manual wiping cannot effectively clean.
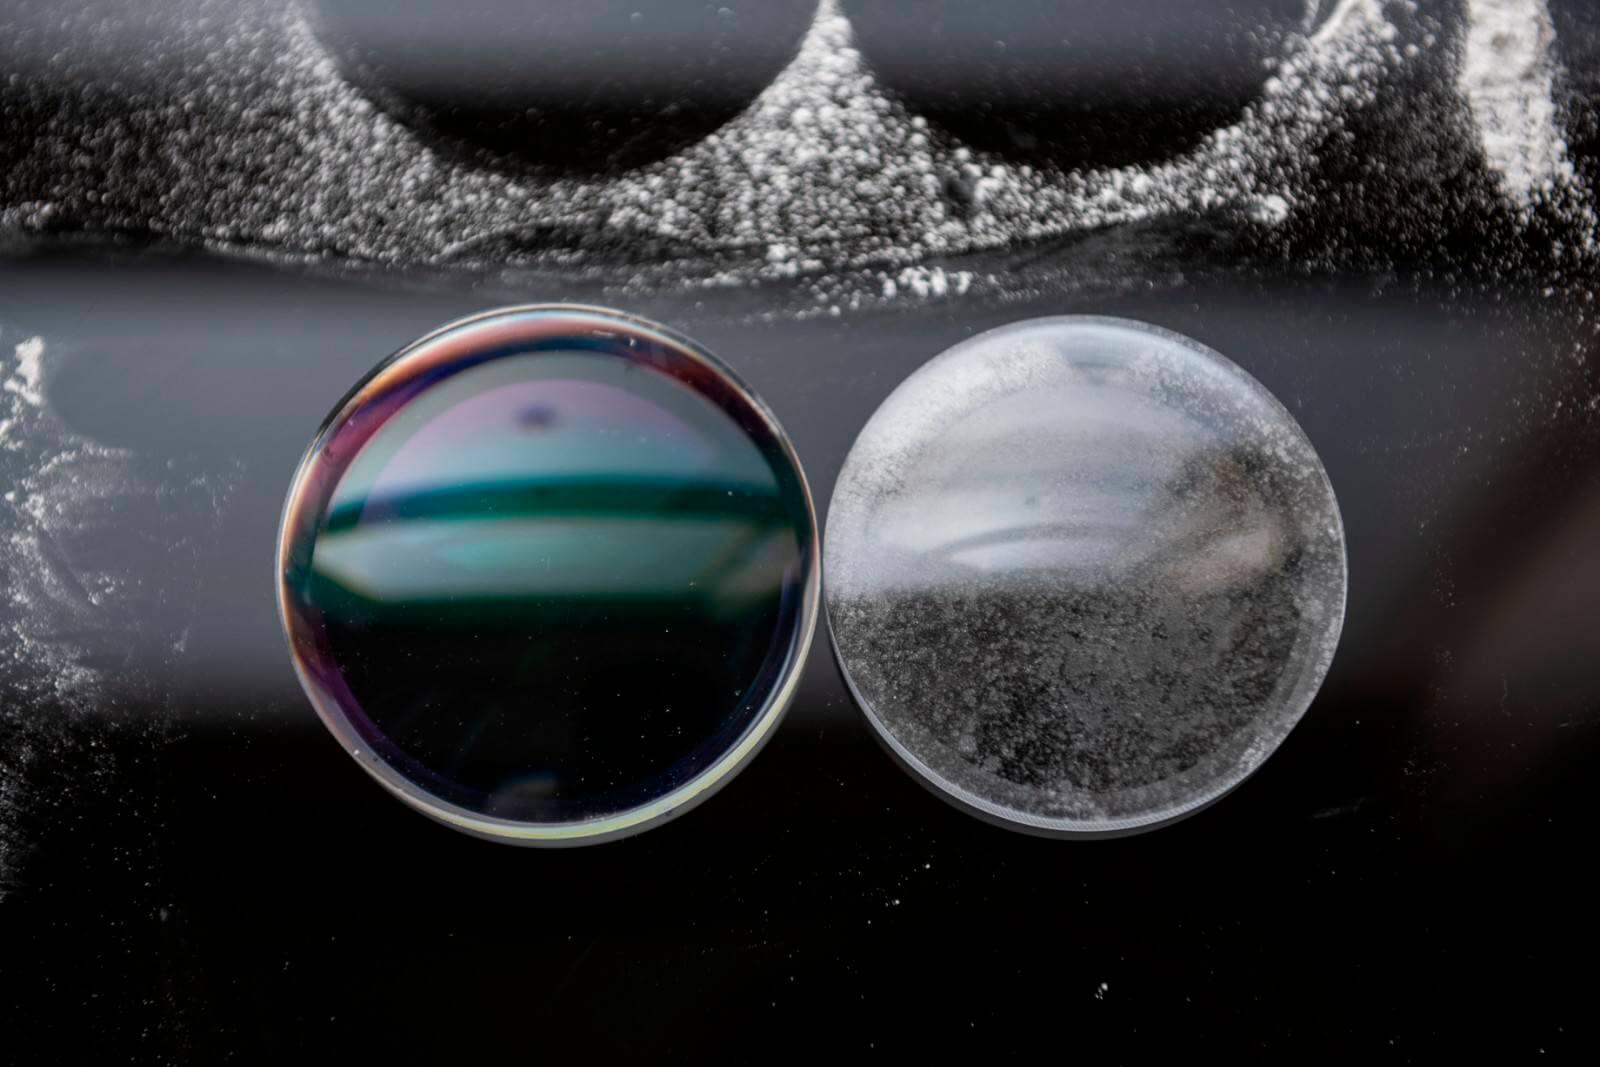
The transparency of glass allows visual confirmation of cleaning effectiveness. Unlike opaque materials where residue might remain hidden, glass reveals any remaining contamination immediately. This instant feedback helps operators determine when cleaning is complete and whether additional cycles or stronger solutions are necessary.
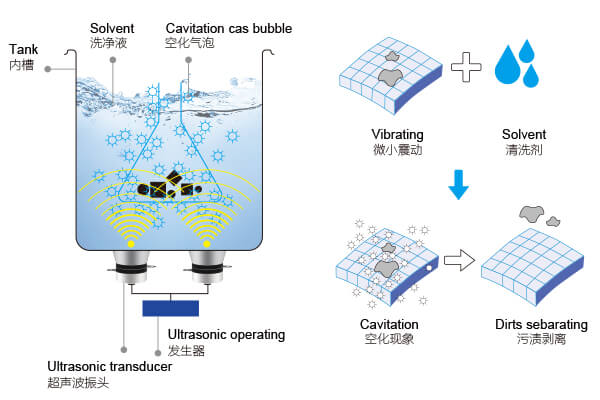
The Principle Behind Ultrasonic Cleaning
Types of Glass Items Perfect for Ultrasonic Cleaning
Eyeglasses and Optical Lenses
Eyeglasses rank among the most commonly cleaned glass items in ultrasonic cleaners. The combination of nose pad residue, skin oils, makeup, and environmental dust creates stubborn contamination in hard-to-reach areas. Manual cleaning struggles to remove buildup from hinges, screw holes, and the junction between lenses and frames. Ultrasonic cleaning reaches all these areas effortlessly.
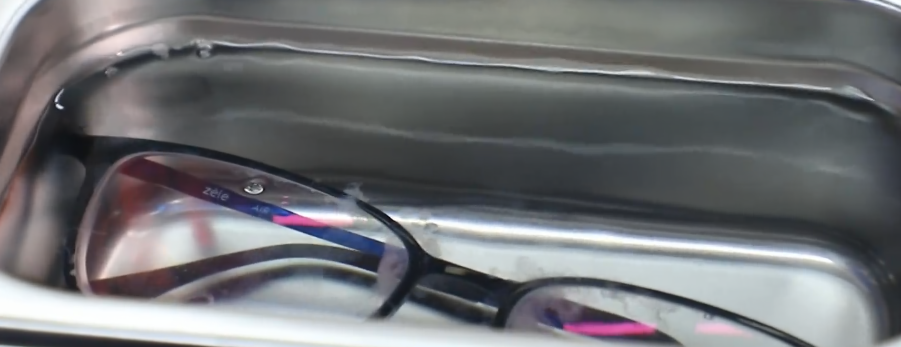
Eyeglasses being cleaned in an ultrasonic cleaning machine
Modern eyeglass lenses, whether glass or plastic, generally tolerate ultrasonic cleaning well. However, coatings require consideration. Anti-reflective coatings, scratch-resistant treatments, and UV protection layers are typically stable in ultrasonic cleaners when used with appropriate solutions. Opticians worldwide use ultrasonic cleaners daily without damaging coated lenses, demonstrating the safety of this method when done correctly.
Prescription safety glasses, sunglasses, and reading glasses all benefit from ultrasonic cleaning. The process removes accumulated grime that gradually reduces optical clarity and can even affect vision accuracy. A three-minute ultrasonic cycle restores glasses to like-new cleanliness, often revealing how dirty they had become compared to their cleaned state.
Laboratory Glassware
Scientific laboratories rely heavily on ultrasonic cleaning for glassware preparation. Beakers, flasks, test tubes, and graduated cylinders accumulate chemical residues, organic compounds, and mineral deposits during use. These contaminants must be completely removed to prevent interference with subsequent experiments. Manual washing, even with brushes and strong detergents, sometimes leaves trace residues that ultrasonic cleaning eliminates.
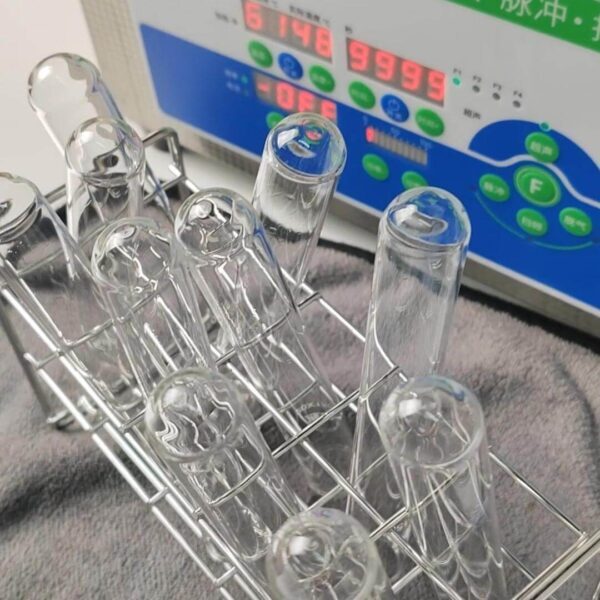
Laboratory Ultrasonic Bath for Glassware Test Tubes Beaker Cleaning
The precision required in analytical chemistry makes ultrasonic cleaning especially valuable. Volumetric glassware used for preparing standard solutions cannot have any residue that might contaminate carefully measured reagents. Ultrasonic cleaning provides the thoroughness necessary for critical applications while reducing the time laboratory personnel spend on cleaning tasks.
Glassware with ground glass joints, narrow necks, or complex shapes particularly benefits from ultrasonic treatment. These features create areas where manual scrubbing is difficult or impossible. The cavitation reaches every surface regardless of geometry, ensuring complete cleaning without the risk of breakage that aggressive manual scrubbing might cause.
Decorative and Household Glass Items
Crystal vases, glass figurines, chandeliers, and decorative glassware accumulate dust, water spots, and fingerprints that dull their appearance. Ultrasonic cleaning restores the brilliance of these items without the tedious hand polishing traditionally required. The process is particularly effective for cut crystal, where multiple facets and deep cuts make manual cleaning time-consuming.
Glass bottles and decanters that held wine, spirits, or oils often develop residue that seems impossible to remove. The narrow openings prevent brushes from reaching all interior surfaces, leaving films and stains. Ultrasonic cleaning penetrates these spaces, breaking down residues and allowing them to be rinsed away. Vintage bottles and decanters that appeared permanently cloudy often emerge crystal clear after ultrasonic treatment.
Glass cookware including measuring cups, mixing bowls, and baking dishes benefit from ultrasonic cleaning to remove baked-on food residues and oil films. While these items also clean well in dishwashers, ultrasonic cleaning reaches etched markings and textured areas more effectively, maintaining clarity and readability of measurement indicators.
Jewelry with Glass Components
Costume jewelry incorporating glass stones, crystal elements, or glass beads cleans beautifully in ultrasonic cleaners. The treatment removes body oils, cosmetic residues, and environmental grime that accumulates in settings and between components. The result is restored sparkle and color saturation that manual cleaning rarely achieves.
Vintage jewelry with glass elements requires more caution, but many pieces tolerate ultrasonic cleaning well. The key is ensuring all adhesives have cured fully and no loose stones exist before cleaning. Modern jewelry construction typically uses secure settings and durable adhesives compatible with ultrasonic cleaning, while older pieces may have deteriorated adhesives that ultrasonic action could dislodge.
Glass watches and clock faces can be cleaned ultrasonically if the timepiece is water-resistant and designed to tolerate immersion. However, this requires careful consideration of the entire assembly. The glass itself will be fine, but seals, movements, and other components determine whether ultrasonic cleaning is appropriate for the complete item.
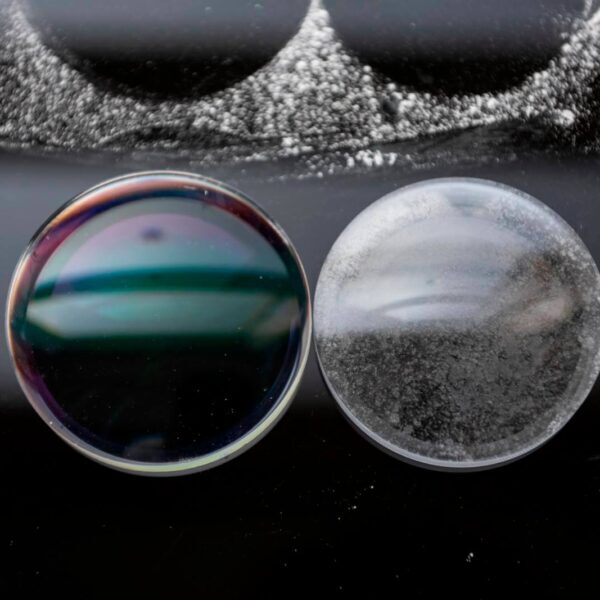
lens
Glass Items to Avoid or Handle with Caution
Antique and Fragile Glass
Antique glass items manufactured before modern production methods may have internal stresses, manufacturing flaws, or compositional variations that reduce their ultrasonic cleaning tolerance. Glass from the 18th and 19th centuries can be surprisingly delicate despite appearing robust. The thermal and mechanical stresses of ultrasonic cleaning might cause cracking or even shattering in severely compromised pieces.
Depression glass, carnival glass, and other collectible vintage glassware often has sentimental or monetary value that warrants extra caution. While many antique glass pieces can be cleaned ultrasonically, testing is advisable. If you must clean valuable antiques, start with very short cycles of 30 seconds to one minute, inspect carefully, and proceed gradually if no problems appear.
Hand-blown glass sometimes contains tiny bubbles, inclusions, or thickness variations that create weak points. These imperfections usually cause no problems during normal use but might respond unpredictably to ultrasonic stress. Art glass and studio glass pieces should be evaluated individually, considering their construction method and overall condition.
Cracked or Damaged Glass
Any glass item with existing cracks, chips, or damage should not be placed in an ultrasonic cleaner. The cavitation action can propagate cracks, turning minor damage into complete failure. The vibrations may cause stressed areas to suddenly fracture, potentially damaging other items in the tank and creating sharp, dangerous debris in the cleaning solution.
Even hairline cracks that seem insignificant can worsen during ultrasonic cleaning. The cavitation bubbles form preferentially along crack lines, where the discontinuity in the surface provides nucleation sites. As these bubbles collapse, they drive stress deeper into the crack, widening and lengthening it. What starts as barely visible damage can become obvious structural failure.
Inspect all glass items carefully before ultrasonic cleaning. Hold them up to light, looking for cracks, and gently tap them while listening for the clear ring of intact glass versus the dull thud of cracked pieces. This simple examination prevents most ultrasonic cleaning disasters involving glass.
Painted or Coated Glass
Glass items with painted designs, fired enamels, or decorative coatings require careful evaluation. Permanent decorations like fired-on designs usually tolerate ultrasonic cleaning well. These decorations became part of the glass structure during manufacturing and won’t be removed by cavitation. However, surface-applied paints, decals, or printed designs may not survive ultrasonic treatment.
Stained glass windows and panels usually feature paint and metallic oxide decorations that were fired onto the glass surface. Most of these are durable enough for ultrasonic cleaning, but very old pieces or those with degraded paints might experience losses. Conservation-grade cleaning methods are preferable for historically significant stained glass.
Mirror backing presents a special case. The reflective coating on mirrors is applied to the glass back and can be delicate. While some modern mirrors use durable coatings that tolerate careful ultrasonic cleaning, older mirrors with mercury or silver backing may delaminate or develop spots. Clean mirrors ultrasonically only if you can afford potential coating damage.
Composite Items with Glass Elements
Items combining glass with other materials often cannot be cleaned ultrasonically, even though the glass component itself would be fine. Picture frames with glass fronts but wooden frames and cardboard backing cannot be immersed. Lamps with glass shades attached to metal or plastic fittings require disassembly if ultrasonic cleaning is desired.
The challenge with composite items is that the non-glass components may not tolerate cleaning solutions, temperatures, or ultrasonic action. Adhesives joining glass to other materials can fail under ultrasonic stress. Water absorption in porous materials leads to staining or dimensional changes. Always consider the complete assembly rather than focusing solely on the glass elements.
Proper Techniques for Cleaning Glass Ultrasonically
Selecting the Right Cleaning Solution
Plain water provides minimal cleaning effectiveness for glass items. While cavitation in pure water removes some loose contamination, most soiling on glass involves oils, proteins, or mineral deposits that require chemical action for complete removal. Adding appropriate cleaning solutions dramatically improves results.
For general glass cleaning, including eyeglasses and household items, use mild alkaline ultrasonic cleaning solutions or specialized eyeglass cleaning concentrates. These formulations typically contain surfactants that break down oils and proteins, along with mild chelating agents for mineral deposits. Dilute according to manufacturer recommendations, usually one part concentrate to 20 or 30 parts water.
For laboratory glassware, specialized laboratory detergents designed for ultrasonic use provide superior results. Products like Alconox or Liquinox are formulated to remove chemical residues without leaving films that could interfere with analytical work. These detergents rinse cleanly and don’t etch glass even with extended exposure.
For heavy mineral deposits, including hard water stains on glass, acidic solutions work best. White vinegar diluted 50-50 with water provides mild acidity that dissolves calcium and lime deposits. For stubborn cases, commercial descaling solutions designed for ultrasonic cleaners offer stronger action. Always rinse thoroughly after using acidic solutions to neutralize any remaining acid.
For delicate items like eyeglasses with anti-reflective coatings, use pH-neutral solutions specifically formulated for coated optics. These gentle formulations clean effectively without risking coating damage. Many opticians sell concentrates suitable for home ultrasonic cleaners.
Temperature Settings for Glass
Room temperature cleaning works adequately for many glass items and eliminates any thermal stress risk. For lightly soiled items or regular maintenance cleaning, ambient temperature solutions provide satisfactory results with maximum safety. This approach is ideal for antique glass or items about which you have any concern.
Heated solutions between 40 and 50 degrees Celsius significantly improve cleaning effectiveness for moderately soiled glass. The elevated temperature increases both the chemical activity of cleaning solutions and the intensity of cavitation. Most oils and organic residues dissolve more readily at these temperatures, shortening cleaning cycles and improving results.
Temperatures above 60 degrees Celsius should be avoided for most glass items. Extreme temperature can create thermal stress, particularly if items are removed from hot solution into cool air. Rapid temperature changes cause differential expansion that can crack glass, especially items with thick walls or complex shapes. Additionally, very high temperatures reduce cavitation efficiency, somewhat defeating the purpose of ultrasonic cleaning.
For eyeglasses, staying below 50 degrees Celsius protects coatings and frame materials. The glass or plastic lenses themselves tolerate higher temperatures, but frame materials like acetate or certain plastics can warp with heat. Conservative temperature settings prevent any possibility of damage to these precision optical items.
Optimal Cleaning Duration
Most glass items achieve excellent cleaning results within three to five minutes of ultrasonic treatment. This duration allows sufficient cavitation action to remove typical soiling without unnecessary energy expenditure or equipment wear. Starting with shorter cycles and inspecting results prevents over-cleaning while ensuring thoroughness.
For routine maintenance cleaning, such as daily eyeglass cleaning, two to three minutes suffices. The soiling is fresh and relatively light, responding quickly to ultrasonic action. Longer cycles provide no additional benefit for maintenance cleaning and simply waste time and energy.
For moderately soiled items that have accumulated significant contamination, five to eight minutes typically achieves complete cleaning. This includes laboratory glassware after use, decorative items that haven’t been cleaned recently, or glass items with textured surfaces that trap dirt.
For heavily soiled or stained glass, multiple shorter cycles with solution changes between them work better than single extended cycles. Clean for five minutes, remove and inspect the item, replace the contaminated solution with fresh cleaning liquid, and repeat. This approach maintains cleaning solution effectiveness and allows progressive removal of stubborn deposits.
Extremely long ultrasonic exposure, beyond 15 to 20 minutes continuously, provides diminishing returns and creates unnecessary stress on both the equipment and items being cleaned. If glass remains visibly dirty after 10 minutes of ultrasonic cleaning, the issue likely involves solution chemistry rather than insufficient time. Switching to a different or stronger cleaning solution will be more productive than extended cleaning in ineffective solution.
Positioning Glass Items Safely
Proper positioning of glass items in the ultrasonic tank prevents damage and optimizes cleaning results. Items should be placed in the cleaning basket rather than directly on the tank bottom. The basket suspends items in the solution where cavitation is most effective while preventing them from contacting the ultrasonic transducers that generate the cleaning action.
Spacing items adequately prevents contact between pieces that could cause chipping or breakage. Each item needs clearance on all sides for solution circulation and even cavitation coverage. Touching items create dead zones where cavitation cannot occur, leaving portions uncleaned.
Orientation matters for items with complex geometry. Position pieces so all surfaces have exposure to the cleaning solution and cavitation action. Hollow items like vases or bottles should be filled with solution to ensure interior cleaning. Trapped air pockets prevent ultrasonic action in those areas.
Avoid overcrowding the cleaning tank. While it’s tempting to clean many items simultaneously for efficiency, overloading reduces effectiveness and increases breakage risk. As a general rule, items should occupy no more than two-thirds of the tank volume, leaving adequate solution volume around each piece.
For especially fragile items, wrapping them loosely in soft cloth provides cushioning without significantly interfering with cleaning action. The cloth dampens any vibration-induced contact between items while allowing solution and cavitation to reach the glass surfaces. This technique works well for antique glass or items with sentimental value.
Common Mistakes and How to Avoid Them
Overcrowding the Tank
The single most common error in ultrasonic glass cleaning is attempting to clean too many items at once. Overcrowding creates several problems that reduce cleaning effectiveness and increase damage risk. Items jostle against each other as the ultrasonic action vibrates the solution, leading to chips, cracks, or breakage. The reduced solution volume per item means contamination builds up quickly, limiting cleaning effectiveness.
Patience in doing multiple smaller batches yields far better results than trying to clean everything simultaneously. Each batch cleans more thoroughly, finishes faster due to better cavitation efficiency, and faces much lower breakage risk. The time saved by overcrowding is lost to re-cleaning items that didn’t get clean the first time or replacing broken pieces.
Using Incorrect Solutions
Plain tap water, while safe for glass, provides poor cleaning results due to lack of surfactants and chemical action. Conversely, using inappropriate harsh chemicals can damage frames, coatings, or even certain specialty glasses. Bleach, strong acids, and alkaline drain cleaners are too aggressive for ultrasonic cleaning applications and can create dangerous fumes when aerosolized by cavitation.
Reading and following dilution instructions for cleaning concentrates ensures optimal results without waste or risk. Stronger solutions are not necessarily better. Properly diluted cleaners maintain the balance between cleaning power and material safety while lasting longer from each bottle of concentrate.
Neglecting Pre-Cleaning Steps
Placing heavily soiled glass items directly into the ultrasonic cleaner without any preparation wastes cleaning solution and reduces effectiveness. Large debris, dried-on substances, or thick layers of contamination should be removed manually before ultrasonic treatment. A quick rinse under running water or wipe with a soft cloth removes bulk contamination, allowing the ultrasonic cleaner to focus on the remaining fine cleaning.
For items with specific problem areas like dried-on paint spots or adhesive residue, pre-treating those areas with appropriate solvents before ultrasonic cleaning prevents the contamination from spreading through the entire cleaning solution. Spot treatment targets stubborn deposits without contaminating the whole batch.
Achieving Professional Results at Home
Pre-Treatment Strategies
Assessing each item before cleaning helps determine the appropriate approach. Lightly soiled items with just fingerprints and dust need only basic cleaning solution and standard cycles. Items with specific issues benefit from targeted pre-treatment that makes ultrasonic cleaning more effective.
For water spots and mineral deposits on glass, pre-soaking in vinegar solution for 10 to 15 minutes before ultrasonic treatment softens the deposits. The ultrasonic action then removes them much more easily than attempting to clean hard, intact mineral scale directly.
Oily or greasy contamination benefits from pre-wiping with isopropyl alcohol before ultrasonic cleaning. Removing the bulk of oil contamination prevents it from emulsifying throughout the cleaning solution, which would redeposit on items as they are removed from the bath.
Post-Cleaning Care
Rinsing cleaned glass items thoroughly with distilled or deionized water prevents water spots and residue formation. Tap water contains minerals that leave deposits as it evaporates. The spotless finish achieved through ultrasonic cleaning deserves protection through proper rinsing technique.
Drying glass items immediately after rinsing maintains the pristine appearance. Air drying allows dust settlement and potential water spot formation. Using a lint-free microfiber cloth or compressed air removes all moisture, leaving glass perfectly clear. For eyeglasses, lens cleaning cloths designed for optical use prevent any risk of scratching while drying.
Applying protective treatments extends the time between cleanings for certain glass items. Anti-fog treatments on eyeglasses, protective waxes on decorative glass, and coatings on laboratory glassware all reduce contamination adhesion. Clean glass accepts these treatments better than contaminated surfaces, maximizing their effectiveness and durability.
Troubleshooting Common Issues
Streaks or films remaining after cleaning usually indicate inadequate rinsing or contaminated cleaning solution. Replace the solution and ensure thorough rinsing with clean water after treatment. For persistent films, adding a rinse aid to the final rinse water helps water sheet off glass surfaces without leaving deposits.
Items not getting completely clean despite adequate time suggests insufficient cleaning solution strength or exhausted solution. Chemical cleaning action is essential for effective ultrasonic cleaning. Increase solution concentration or use a specialized cleaner for the specific type of contamination present.
Chatter marks or unusual patterns on glass after cleaning indicate items were touching the tank sides or each other during operation. Ensure proper spacing and use of the cleaning basket to suspend items away from contact surfaces.
White residue or cloudiness appearing after cleaning of previously clear glass suggests either mineral deposition from hard water or chemical residue from inappropriate cleaning solutions. Switch to distilled water for rinsing and verify your cleaning solution is appropriate for glass.
Testing ultrasonic glass cleaning with literally thousands of items over multiple years provides insights that manufacturer guidelines don’t cover. The success rate for properly selected glass items exceeds 99 percent when appropriate techniques are followed. Damage incidents almost always trace back to ignoring basic guidelines about cracked glass, inappropriate temperatures, or overcrowding.
The efficiency gains compared to manual cleaning are substantial. Items requiring 10 to 15 minutes of careful hand cleaning emerge spotless from three minutes of ultrasonic treatment. For businesses cleaning numerous glass items daily, like opticians or laboratories, ultrasonic cleaners pay for themselves within weeks through labor savings alone.
Quality of cleaning surpasses manual methods for complex geometries. The microscopic cavitation reaches into etched patterns, threaded areas, and tight corners that manual cleaning cannot adequately address. This thoroughness matters particularly for applications where any residue creates problems, such as analytical glassware or precision optics.
The key to consistent success lies in matching technique to the specific glass item and its condition. Conservative approaches with room temperature solutions and short cycles handle delicate or valuable pieces safely. More aggressive cleaning with heated solutions and longer cycles addresses heavily soiled items efficiently. Understanding these variables and applying them appropriately produces reliable, professional-quality results from home ultrasonic cleaners.