Everyday cleanliness often hides in plain sight. That glistening pair of eyeglasses, the surgical instrument in a sterile tray, or the intricate gears of a luxury watch—all these items owe their shine and functionality to processes that go beyond just water and scrubbing. Among these, ultrasonic cleaning stands out as a modern marvel. But how exactly does it work? What makes it so effective across industries from healthcare to jewelry, electronics to automotive?
At its core, ultrasonic cleaning taps into sound—sound so high in frequency that human ears can’t detect it. These ultrasonic waves create microscopic bubbles in liquid, a phenomenon known as cavitation. When these bubbles collapse, they release energy that dislodges dirt, oil, and contaminants from even the tiniest crevices. This is not simply about making something look clean on the surface; it’s about reaching the places that brushes, wipes, and sprays cannot.
What makes this method especially fascinating is that it’s both powerful and gentle. It’s strong enough to lift contaminants from metal gears but delicate enough to clean a gold ring without scratching its surface. As we delve deeper, we’ll explore how ultrasonic waves are generated, what components make the system work, and why this approach has become indispensable in modern cleaning technologies.

The ultrasonic cleaner is cleaning the eyeglasses
Inside the Machine: Key Components of an Ultrasonic Cleaner
It’s easy to think of an ultrasonic cleaner as just a metal box that buzzes and hums. But inside, a symphony of components works in tandem to create that ultrasonic magic. Understanding these internal parts not only helps us appreciate the engineering behind the technology but also explains why certain features matter—especially when choosing a cleaner for specific tasks.
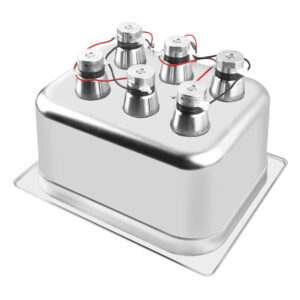
At the heart of every ultrasonic cleaner is the ultrasonic transducer. This component is responsible for converting electrical energy into high-frequency sound waves. Most transducers are bonded to the underside of the cleaning tank. When energized, they vibrate rapidly, transferring their energy into the liquid medium above. Without the transducer, cavitation simply wouldn’t happen.
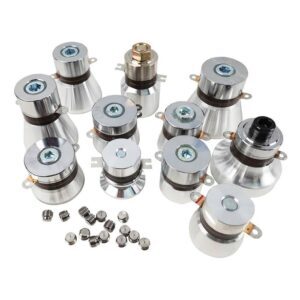
Then there’s the ultrasonic generator—essentially the power brain of the device. This part regulates the frequency and power of the electrical signal sent to the transducers. Modern ultrasonic cleaners allow users to control parameters like frequency, cycle duration, and amplitude, offering tailored cleaning for different items. A higher-end generator might even include sweep frequency functionality, which alternates frequencies to prevent “dead zones” in the tank where cavitation might otherwise weaken.

Of course, everything happens inside the cleaning tank. Usually made of stainless steel to resist corrosion and handle repeated vibration, the tank is where the cleaning fluid resides and where the items are placed—ideally, suspended in a basket. Tank design matters more than one might assume: depth, wall thickness, and even shape can affect how evenly cavitation is distributed throughout the liquid.
The cleaning basket may seem optional, but it plays a critical protective role. As we’ve discussed in earlier articles, placing items directly on the tank floor can damage both the items and the transducers. The basket keeps objects safely suspended, allowing cavitation to surround them evenly and preventing mechanical stress on delicate parts.

Some models also feature a heating element, typically located underneath or around the tank. Heat accelerates chemical reactions, so warm cleaning solutions often work more effectively. But too much heat can damage certain materials or adhesives—so temperature control is a mark of a well-designed machine.
Other useful parts include drainage valves for easy fluid removal, digital control panels for precision setting, and degas modes that remove trapped air from the liquid before cleaning starts, which can enhance cavitation performance.
Each of these elements plays a distinct role, and their synergy is what allows an ultrasonic cleaner to deliver results that manual scrubbing or soaking just can’t achieve. Whether you’re dealing with complex watch parts or a pair of eyeglasses, it’s the interplay of hardware, sound, and fluid dynamics that makes it all possible.
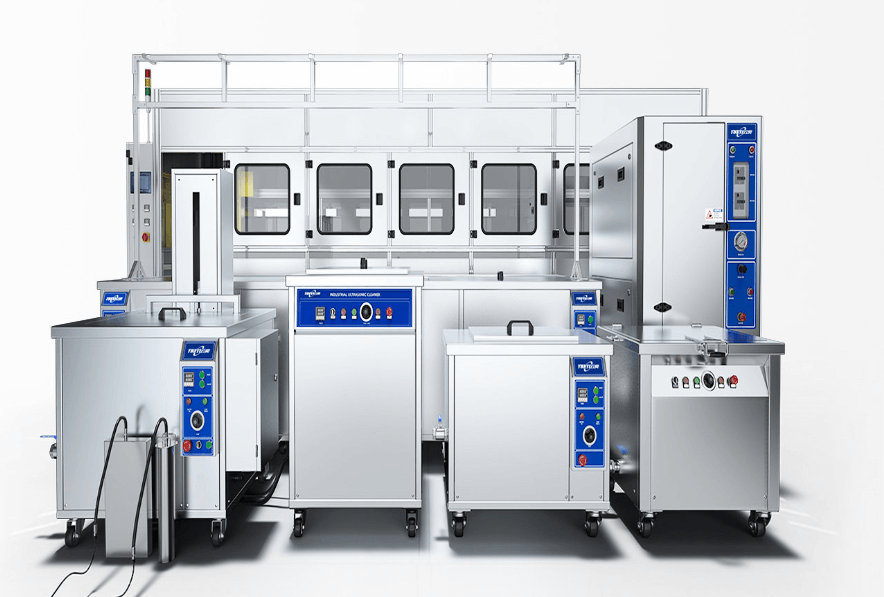
Different Types of Ultrasonic Cleaners: Home vs Industrial Use
Not all ultrasonic cleaners are created equal. While they all operate on the same fundamental principle—using high-frequency sound waves to clean—home-use devices and industrial models are built with distinctly different priorities in mind. Understanding these differences can help you choose a machine that fits your needs without overspending or compromising performance.
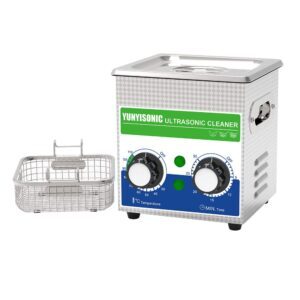
Let’s begin with home ultrasonic cleaners. These machines are typically compact, lightweight, and designed for ease of use. You’ll often see them marketed for cleaning eyeglasses, dentures, jewelry, and even makeup brushes. They usually operate at a fixed frequency around 40 kHz, which provides a gentle cleaning action—ideal for delicate items that don’t require aggressive scrubbing.
Home units tend to feature a small tank capacity, often between 300 ml to 2 liters, and include simple control options like an on-off switch or a basic timer. Some may include a small heater, but in most cases, the device relies on room-temperature or warm tap water mixed with mild detergent. These models are perfect for people who want low-maintenance, fast cleaning on a daily or weekly basis.

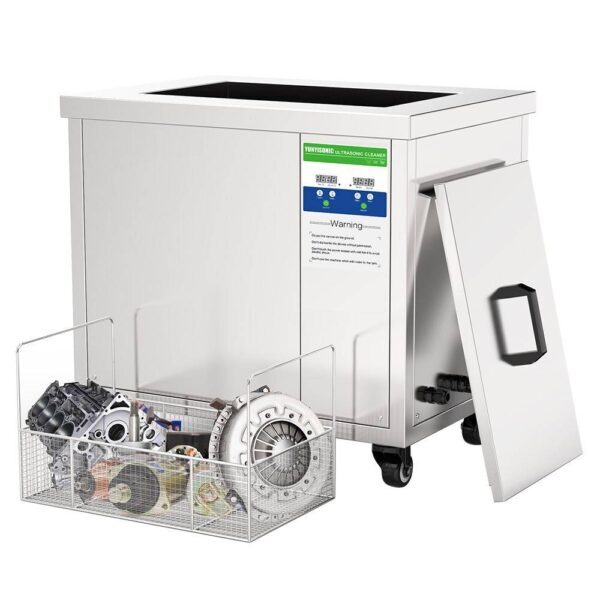
In contrast, industrial ultrasonic cleaners are built for power, scale, and durability. These machines are used in factories, hospitals, dental clinics, watchmaking workshops, and laboratories—anywhere that parts, tools, or instruments require intense, thorough cleaning. Industrial models may have tank capacities ranging from 10 liters to several hundred liters and can support multi-stage cleaning systems (wash, rinse, dry).
They often feature adjustable frequencies, sometimes offering multiple modes (such as sweep, pulse, or semiwave), and much stronger ultrasonic power output. Many industrial units include multi-frequency transducers, allowing operators to switch between deep cleaning (low frequency) and precision cleaning (high frequency) depending on the task.
These cleaners are also built with heavy-duty stainless steel, programmable digital controls, temperature regulation, and even filtration systems that extend fluid life. A facility cleaning delicate medical instruments will have different needs than one cleaning industrial molds or engine parts, and industrial ultrasonic cleaners are designed with that flexibility in mind.

To better visualize the contrast:
| Feature | Home Ultrasonic Cleaner | Industrial Ultrasonic Cleaner |
|---|---|---|
| Tank Size | 300 ml to 2 L | 10 L to 200+ L |
| Power Output | 30 to 120 watts | 300 to 3000+ watts |
| Frequency Options | Usually fixed at 40 kHz | Adjustable, 20 to 80 kHz or more |
| Cleaning Intensity | Gentle | Moderate to aggressive |
| Controls | Manual or simple digital | Programmable, multi-function |
| Materials | Consumer-grade housing | Heavy-duty stainless steel |
| Applications | Jewelry, glasses, household tools | Medical tools, engine parts, industrial molds |
So which one should you choose?
If you’re just trying to clean personal items at home, a basic unit is more than enough. But if your work involves frequent, professional-grade cleaning of complex or heavily soiled items, investing in an industrial model—or at least a mid-range professional ultrasonic cleaner—can save time, reduce labor, and prolong the lifespan of your equipment.
How to Use an Ultrasonic Cleaner Properly
Using an ultrasonic cleaner might seem straightforward—add water, insert item, press start—but there’s a difference between using the machine and using it correctly. To truly get the best results, avoid common mistakes and follow a mindful, systematic approach that respects the physics of ultrasonic cleaning.
Start by choosing the right cleaning solution. While plain tap water can conduct ultrasonic waves, it is rarely enough to remove oils, oxidation, or embedded grime. Most users add a small amount of a cleaning agent—something that reduces surface tension and helps cavitation bubbles access every nook and cranny. These cleaning agents should be compatible with the item being cleaned. For example, pH-neutral solutions are ideal for delicate optics, while mildly alkaline detergents are better for metal parts with grease buildup.

Next comes filling the tank. Use warm water (not boiling hot) if your unit doesn’t include a heater. The water level should always cover the items but not exceed the fill line. Never run an ultrasonic cleaner dry, as this can damage the transducer.
After filling the tank and adding your detergent, many professionals recommend degas the solution—that is, let the cleaner run without any items inside for a few minutes. This removes trapped air from the liquid, which can otherwise interfere with bubble formation and reduce cleaning efficiency.
Now it’s time to place your items in the basket—never directly on the tank bottom. The basket suspends items in the solution, allowing ultrasonic waves to pass through all surfaces. This avoids scratching the tank and prevents contact with the transducer plate, which could cause mechanical damage or reduced performance.
Set your timer carefully. Depending on the object’s material and contamination level, you may only need 1 to 5 minutes for light cleaning, or 10 to 20 minutes for heavily soiled items. Running it too long can degrade certain plastics, coatings, or adhesives. Always check the manufacturer’s guidelines, especially for electronics or complex components.
Once the cycle ends, remove the items gently, rinse them with distilled or clean water, and dry with a lint-free cloth or allow them to air dry. Reusing the cleaning solution for multiple cycles is fine—but only up to a point. Once the solution becomes visibly dirty or loses its effectiveness, it’s time to replace it.
Some people might wonder: Can I clean multiple items at once? Yes—but don’t overcrowd. Overlapping or stacking items can block ultrasonic waves and lead to uneven results. If your cleaner supports multiple baskets or a tray system, keep items spaced to allow for even exposure.
Proper maintenance of the ultrasonic cleaner is just as crucial. After use, always drain the tank, wipe down the surfaces, and inspect for residue or buildup. A neglected cleaner leads to contaminated cycles and a shorter machine lifespan.
And remember—different materials behave differently in an ultrasonic bath. For example, metals respond very well, while porous stones, wood, or certain plastics may absorb moisture or degrade. Always do a spot test if you’re unsure.
The Physics Behind Ultrasonic Cleaning: Cavitation in Action
At the heart of ultrasonic cleaning lies a phenomenon that seems almost magical until you understand the science: cavitation. When people describe ultrasonic cleaners as “using sound to clean,” they’re simplifying a fascinating physical process that relies on microscopic bubbles doing heavy-duty scrubbing.
So, what exactly is cavitation? Imagine a liquid—typically water mixed with a cleaning agent—being bombarded by high-frequency sound waves, usually ranging from 20 kilohertz to 80 kilohertz. These sound waves create alternating pressure cycles—some that pull the liquid molecules apart, and some that push them together. During the low-pressure phase, tiny vacuum bubbles, or voids, form in the liquid. These are the cavitation bubbles.
These bubbles are not stable; they’re highly energetic and exist for only fractions of a second. When the pressure rises during the high-frequency wave’s next cycle, the bubbles collapse or implode with incredible force. It’s this collapse that does the real work. The implosion creates a microjet of liquid and a shockwave, capable of dislodging even tightly bound dirt, grime, or oxidation particles from surfaces—even from inside microscopic crevices.
To get a sense of scale, the energy released from a single cavitation bubble may seem minuscule, but ultrasonic cleaners create millions of these bubbles every second, throughout the entire volume of the cleaning solution. The result is a gentle yet thorough scrubbing action on every exposed surface, including places where bristles, cloths, or even brushes can’t reach—like inside blind holes, under tiny screws, and around intricate engravings.
One of the most misunderstood aspects is the relationship between frequency and cleaning intensity. Lower frequencies like 25 kHz produce larger, more forceful bubbles, which are better suited for heavy-duty industrial cleaning—think carburetors, engine parts, or surgical tools. Higher frequencies like 40 kHz or even 80 kHz generate smaller, gentler bubbles that are ideal for precision cleaning of delicate objects like jewelry, circuit boards, or eyeglasses. Some advanced units even offer dual-frequency modes to give you flexibility in cleaning tasks.
Temperature also plays a crucial role. As the temperature of the cleaning solution increases (within a controlled range), cavitation becomes more efficient. That’s why many ultrasonic cleaners come with built-in heaters—typically adjustable between 20 and 80 degrees Celsius. Warmer solutions help dissolve grease and oils more quickly and reduce the surface tension of the liquid, making cavitation more vigorous.
You might wonder: does cavitation damage surfaces? Under normal operating conditions, no. In fact, ultrasonic cleaning is considered one of the safest methods for cleaning fragile items because the energy involved is microscopic and distributed evenly. But prolonged exposure or overly aggressive settings can sometimes erode soft metals, delicate coatings, or glued seams—so moderation and proper settings are key.
The takeaway? Ultrasonic cleaning isn’t magic, but it sure feels like it. The combination of precision frequency control, solution chemistry, and tiny collapsing bubbles creates a method that’s effective, efficient, and surprisingly gentle. And understanding the science behind it helps you use the device more wisely, whether you’re cleaning a diamond ring or a dental scaler.
Final Thoughts: Ultrasonic Cleaning Is Science, Not Magic
There’s something quietly satisfying about ultrasonic cleaning. You drop something grimy into a tub, walk away, and come back to find it gleaming like new. But behind that simplicity is a complex blend of physics, chemistry, and engineering.
It’s not magic—it’s science.
Understanding how ultrasonic cleaning works makes all the difference. It lets you choose the right frequency for your application, pick a cleaning solution that won’t harm your items, and avoid damaging expensive equipment through improper use. Whether you’re a hobbyist restoring vintage tools or an engineer sterilizing lab gear, treating ultrasonic cleaning as a precise, methodical process will reward you with better results and longer-lasting machines.
So next time you hear that humming bath doing its work, know this: millions of microscopic bubbles are collapsing with perfect coordination, performing a task that no brush or solvent could match on its own. And now, you not only know what’s happening—but how to harness it with skill.