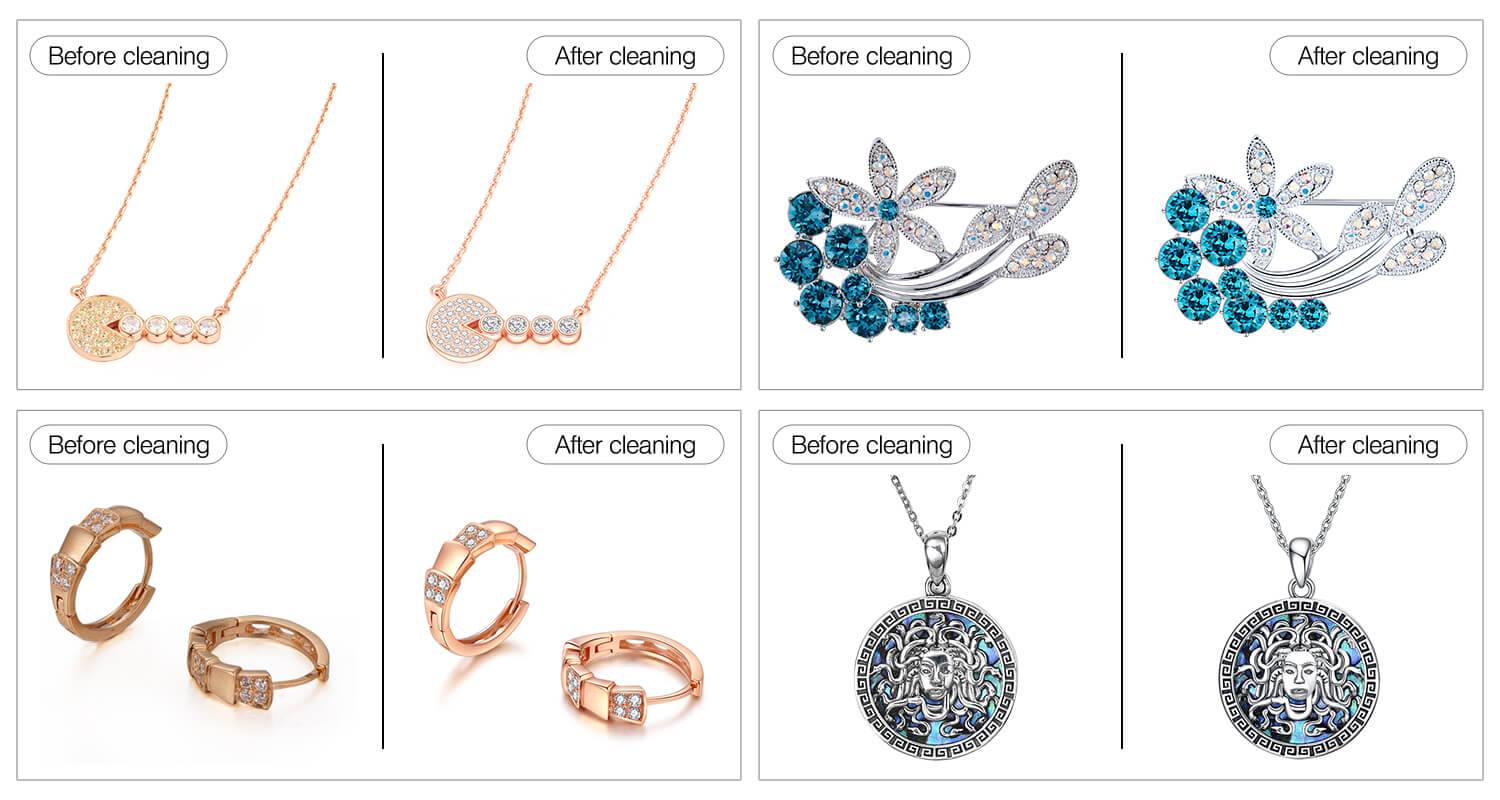
There’s something unmistakably elegant about sterling silver. Whether it’s a minimalist bangle, a vintage serving tray, or your favorite pair of earrings, sterling silver brings a timeless beauty that complements both modern and classic styles. But as anyone who owns silver knows, that shine doesn’t last forever.
Maybe you’ve pulled out a necklace you haven’t worn in a while, only to find it coated in a dull, yellow-gray film. Or perhaps your silverware has lost its luster despite sitting untouched in the drawer. What you’re seeing is tarnish, a natural chemical reaction between silver and sulfur-containing compounds in the air—or sometimes even in your sweat or perfume.
Tarnish doesn’t mean your silver is ruined. In fact, it’s a surface-level reaction that can often be reversed. The real question is how best to clean it—and keep it clean—without risking damage to the piece itself.
That’s where ultrasonic cleaning enters the picture. For some, it’s a game-changer; for others, it raises questions: Is it too aggressive? Will it damage the surface? Can sterling silver safely be cleaned in an ultrasonic cleaner—or should I stick to polishing cloths and elbow grease?
Let’s dive into what makes sterling silver both durable and delicate, and how ultrasonic cleaning can help (or harm) if not used correctly.
Understanding What Sterling Silver Really Is
Despite its name, sterling silver isn’t 100% pure silver. That’s actually a good thing.
Pure silver—also called fine silver—is too soft to be used in most jewelry or utensils. It bends easily, scratches like butter, and doesn’t hold its shape well. So to make it more durable, manufacturers blend it with small amounts of other metals—usually copper. The result is what we know as sterling silver, which is 92.5% silver and 7.5% alloy.
That 7.5% makes all the difference in terms of practicality and longevity—but it’s also the reason sterling silver tarnishes.
Copper, when exposed to air, moisture, and sulfur, reacts and forms dark-colored compounds on the surface. That tarnish layer grows over time, creating a film that dulls the reflective quality of the metal. Even your body’s natural oils, lotions, or perfumes can accelerate the process. And unfortunately, ultrasonic cleaners don’t just clean the silver—they interact with everything on the surface, including that tarnish layer.
So here’s the key point: while ultrasonic cleaning can restore brilliance to sterling silver, it has to be done with precision. The method is fast and thorough—but also unforgiving if the wrong settings or solutions are used.
Sterling Silver Jewelry
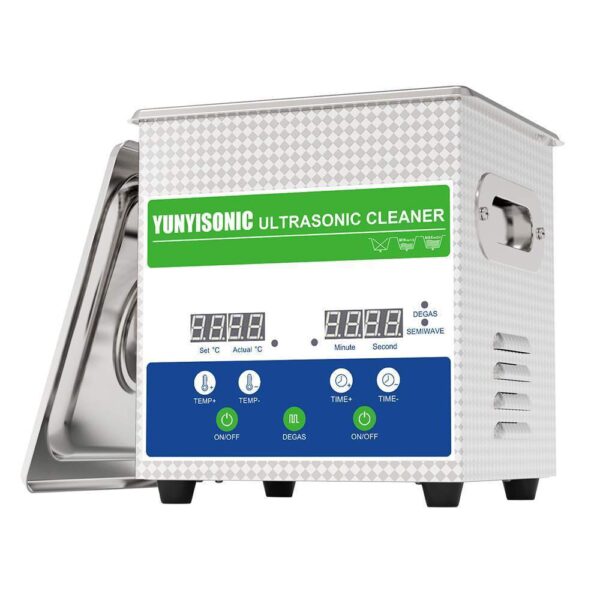
What Is an Ultrasonic Cleaner and Why Is It Used for Jewelry?
If you’ve ever watched a jeweler clean a ring in a matter of minutes and wondered what kind of wizardry was involved, chances are you were looking at an ultrasonic cleaner in action.
At its core, an ultrasonic cleaner uses high-frequency sound waves—typically in the range of 20 to 200 kilohertz—to create microscopic bubbles in a liquid solution. These bubbles are the result of cavitation, a process where pressure changes rapidly in the liquid, causing tiny voids to form and collapse. When they collapse near a surface—like a piece of silver jewelry—they create powerful but localized scrubbing action.
Imagine millions of tiny brushes scrubbing your jewelry at once, all reaching into the smallest crevices that human fingers or cloths can’t. That’s the magic of ultrasonic cleaning. It removes grime, dirt, polishing compound, skin oil, and even microscopic contaminants in places like between prongs, underneath gemstones, or inside chain links.
It’s why ultrasonic cleaners are so popular with jewelers, watchmakers, dental professionals, and even mechanics. They’re not just for the surface sparkle—they help restore functionality and hygiene too.
But like all powerful tools, they require finesse. Put the wrong item in, or use the wrong settings, and that same power can damage what you’re trying to protect. Sterling silver, while durable in everyday life, has characteristics that make it more sensitive to ultrasonic misuse than people realize.
Can Sterling Silver Be Safely Cleaned in an Ultrasonic Cleaner?
Yes, sterling silver can generally be cleaned in an ultrasonic cleaner, but with caution. It’s not a blanket yes—it’s a conditional yes, depending on the condition of the item, the type of tarnish, the presence of other materials (like gemstones or adhesives), and how the ultrasonic cleaner is used.
Most jewelers do use ultrasonic cleaners on silver regularly. However, they are selective about what types of silver pieces go in the tank. Simple sterling silver items—like a plain silver band, a chain, or a spoon—usually clean very well with ultrasonic cleaning. The cleaner removes grime and oxidation quickly, often restoring the mirror finish that makes silver so appealing.
But if the silver piece has:
- Heavy tarnish that’s chemically bonded to the surface
- Delicate gemstone settings
- Oxidized or antiqued finishes (deliberate darkening for aesthetic effect)
- Epoxy, glue, or resin-mounted elements
- Loose or fragile solder joints
…then ultrasonic cleaning becomes a bit more risky.
In these cases, the cleaner might strip away intentional patinas, loosen settings, or even pocket and pit the surface if cavitation is too intense. This is especially true for cheaper or older sterling silver items that might not be well-crafted.
So, while the ultrasonic cleaner is a powerful tool in your cleaning arsenal, it’s not a one-size-fits-all solution for sterling silver. Knowing when and how to use it is the difference between brilliant results and regrettable damage.
Real Risks: When Ultrasonic Cleaning Might Damage Sterling Silver
The phrase “safe if used correctly” often feels like a marketing cop-out—but in the case of ultrasonic cleaning and sterling silver, it’s absolutely justified. Ultrasonic cleaners are powerful, and while they don’t damage silver by default, they can accelerate or expose vulnerabilities that already exist.
One of the most common issues is cavitation pitting. If the cleaning frequency is too low or the solution is too aggressive, the collapsing bubbles can chip away at the surface of the silver, leaving tiny pits. These might be invisible at first, but under magnification—or after repeated cleanings—they can dull the finish or lead to eventual structural wear.
Another risk comes from chemical interaction. Some people use homemade cleaning solutions or harsh commercial detergents that contain ammonia or acids. These substances can react with the copper in sterling silver, leaving behind yellowish or bluish stains, or causing etching on the surface. Once this happens, the damage is permanent.
Then there’s the issue of soft solder joints. Many silver pieces, especially vintage ones, were assembled using lead-based or low-temp solders. The vibrations of the ultrasonic bath can weaken these joints over time, leading to pieces coming apart—often without warning.
And perhaps most commonly: accidental damage to other materials. Many sterling silver items aren’t pure metal. They may be set with stones, coated with resin, layered with enamel, or partially oxidized for aesthetic effect. The ultrasonic cleaner doesn’t distinguish between what you want to clean and what you want to preserve. So unless you’ve done your homework—or your silver is plain and unadorned—you could be cleaning away more than just dirt.
Professional Guidelines and Lab Recommendations
When it comes to gemstone and metal care, few names carry as much weight as the Gemological Institute of America (GIA). According to GIA’s published cleaning chart, sterling silver is generally safe for ultrasonic cleaning, provided it doesn’t contain sensitive materials like pearls, opals, or glued-in stones.
The Jewelers Vigilance Committee (JVC) and JTV’s Jewelry Cleaning Guide also echo this sentiment. They recommend ultrasonic cleaning for sterling silver as long as it’s free of coatings and you use a mild solution, moderate temperature, and reasonable cleaning duration.
Commercial ultrasonic cleaner manufacturers such as Elma, CREWORKS, and iSonic specify in their manuals that sterling silver can be cleaned in their tanks, but caution against overuse, high heat, or high alkalinity solutions.
In essence, professional consensus is clear: ultrasonic cleaning is safe for sterling silver—but not universally. You must inspect the item, use appropriate solutions, and monitor each cleaning session. That’s exactly how professionals do it, and it’s the approach you should adopt at home, too.
Jeweler Insights: What the Pros Say About Cleaning Silver Ultrasonically
Ask ten jewelers if they use ultrasonic cleaners on sterling silver, and you’ll probably hear ten variations of “yes, but…”
Jewelers love ultrasonic machines. They save time, reduce the need for abrasive polishing, and reach places human hands can’t. But they also know when not to use them. During a survey of small jewelry shops and online forums like Ganoksin, multiple professionals pointed out that:
- Tarnish level is a key factor. If the silver is lightly tarnished, ultrasonic cleaning works great. But if the tarnish is heavy, it may need pre-treatment or manual polishing first.
- Antiqued finishes should never go in an ultrasonic bath. The vibrations can strip the darkened patina that gives antique pieces their unique character.
- Gemstones are a wildcard. Even sturdy stones like garnet or topaz can loosen in the bath, while softer ones like turquoise, lapis, or malachite can be ruined entirely.
- Settings and solder joints are checked beforehand. Any movement, rattle, or looseness is a red flag. No responsible jeweler puts a fragile piece in the tank.
Interestingly, many jewelers also noted that customers tend to overestimate the effectiveness of ultrasonic cleaners. They’re great at removing dirt and oils—but they don’t always remove tarnish. For that, a polishing cloth or chemical dip may still be needed after ultrasonic cleaning.
Preparing Sterling Silver for Ultrasonic Cleaning
So you’ve determined that your silver item is safe to go into an ultrasonic cleaner. Great—but don’t just toss it in the tank.
Start with a careful visual inspection. Look for:
- Loose stones
- Cracks or chips in the metal
- Discoloration that might be an applied finish
- Epoxy or glue holding parts together
- Hallmarks or stamps that appear shallow or worn
If the piece passes inspection, the next step is cleaning setup.
Always place silver items in the included basket or mesh tray, never directly on the bottom of the tank. Direct contact with the ultrasonic transducer surface can cause intense localized cavitation, which might scratch or dent the metal.
Use a dedicated jewelry cleaning solution—preferably one labeled “non-ammoniated” and safe for sterling silver. These solutions are formulated to break down oils and light tarnish without damaging the alloy.
Set the temperature to around 40°C (104°F) and limit cleaning time to 3–5 minutes for most pieces. Longer exposure can start to affect joints or delicate details.
After the cycle, rinse thoroughly with distilled water (to avoid hard water spots) and dry with a soft, lint-free cloth. If needed, follow up with a gentle silver polishing cloth to remove residual tarnish and bring out a mirror shine.
Taking just a few extra minutes to prep properly makes the difference between a stunning result and an “oops, I ruined it” moment.
Recommended Ultrasonic Cleaner Settings for Sterling Silver
One of the most common mistakes people make with ultrasonic cleaners isn’t using the wrong machine—it’s using the right machine the wrong way. When it comes to sterling silver, a few key adjustments make all the difference between a gentle polish and accidental damage.
Let’s start with frequency. Most consumer-grade ultrasonic cleaners operate at 40kHz, which is a solid middle ground. It’s aggressive enough to dislodge grime, but gentle enough for most jewelry. Higher frequencies (like 68kHz or 80kHz) are available on some dual-frequency models and can offer even gentler cleaning, especially useful if you’re dealing with fine chains, filigree work, or delicate settings.
Temperature matters, too. While heat improves cleaning efficiency by loosening oils and residues, it also increases chemical activity in the solution. For sterling silver, the sweet spot is typically 30–45°C (86–113°F). Too much heat—especially above 50°C—can risk discoloration or accelerate any reactions with copper content in the alloy.
Time should be carefully managed. Many people assume “the longer, the better,” but that’s a risky assumption. A standard 3–5 minute cycle is more than enough for sterling silver. If you’re dealing with a more stubborn cleaning job, it’s better to run multiple short cycles, inspecting the item in between, than to run a single long one.
Last but not least, power setting and solution concentration. If your cleaner has adjustable power, start low and increase only if necessary. More is not always better—particularly with silver. Use the manufacturer’s recommended dilution for your chosen solution. Over-concentrating might speed up cleaning, but it also increases the chances of etching or staining.
When in doubt, treat your silver like fine crystal—gentle care wins in the long run.
Special Cautions: Silver with Stones, Enamel, or Antiquing
Not all sterling silver is straightforward. In fact, many pieces contain design elements or additional materials that dramatically change how you should clean them. These are the “look twice before you clean” items—and they deserve special attention.
First, stones. If your silver jewelry includes gemstones, ultrasonic cleaning becomes more complex. Hard stones like diamonds, sapphires, and rubies are usually fine—but only if they’re properly set. Loose prongs or glued-in stones are red flags. Soft or porous stones—like turquoise, amber, opals, pearls, malachite, or lapis—should never go into an ultrasonic cleaner. These gems can absorb water or crack under pressure from cavitation waves.
Next is enamel work. Decorative enamel inlays might look like painted-on glass, but they’re often delicate and can be prone to chipping, especially under the stress of ultrasonic vibration. Worse, if the enamel is vintage or heat-sensitive, it may degrade or lift entirely.
Antiqued or oxidized finishes are also tricky. These darkened patterns or textures are often applied deliberately to enhance contrast in silver designs—think Celtic knot rings or vintage floral brooches. Ultrasonic cleaners can scrub away that patina, leaving the piece looking oddly flat or uneven. And once it’s gone, it’s hard to restore without professional help.
Finally, glued or resin-set pieces are a no-go. Many low-cost or costume silver items use adhesives to mount stones or parts. Ultrasonic cleaners can weaken or dissolve glue over time—sometimes during the very first cleaning.
If your sterling silver contains any of these materials or finishes, skip the ultrasonic and clean by hand instead. It might take more time, but you’ll avoid irreversible damage.
What Cleaning Solutions Work Best for Sterling Silver?
The cleaning solution you use in your ultrasonic cleaner is just as important as the machine itself.
For sterling silver, you need a solution that’s both effective and non-reactive. That rules out a surprising number of household products that are often suggested in DIY guides—like ammonia, bleach, vinegar, or lemon juice. These are too acidic or too alkaline, and they can cause long-term surface damage, discoloration, or even corrosion.
Instead, look for professional ultrasonic cleaning solutions labeled safe for silver or mixed-metal jewelry. These are typically mildly alkaline, non-ionic, and designed to lift oils, dirt, and light tarnish without harming the silver’s surface.
Some of the most trusted products in the jewelry industry include:
- Elma Jewelry Clean A3 – A gentle concentrate safe for precious metals.
- iSonic CSGJ01 – Specifically formulated for silver, gold, and platinum.
- JSP Jewelry Ultrasonic Cleaner Solution – Popular among both hobbyists and professionals for cleaning without stripping patinas.
If you’re using a non-commercial cleaner, opt for a few drops of mild, phosphate-free dish soap in warm distilled water. This won’t remove tarnish, but it will clean off oils and dirt safely.
Whatever solution you choose, follow dilution instructions carefully, and always rinse your silver with distilled water after cleaning. Tap water may leave minerals or chlorine residue that accelerates tarnishing.
And avoid solutions that promise to “dissolve tarnish in seconds.” If it sounds too good to be true—it usually is.
A Better Way to Clean Heavy Tarnish: Ultrasonic Pre-Soak and Boosted Cleaning
Sometimes, ultrasonic cleaning alone won’t do the trick—especially for heavily tarnished silver that’s been neglected for months (or years). If you’ve tried a standard cycle and the silver still looks dull or patchy, don’t rush to scrub or polish. There’s a smarter, safer method: pre-soaking.
Pre-soaking involves placing the silver in a gentle, tarnish-lifting solution before ultrasonic cleaning. Some professional products are designed for this dual-stage approach. For example, Goddard’s Jewelry Cleaner or Connoisseurs Silver Jewelry Cleaner can be used to soften the tarnish before the ultrasonic cleaner removes the residue.
Here’s how to do it right:
- Pre-soak for 2–5 minutes in a tarnish-dissolving solution (always check compatibility with silver).
- Rinse thoroughly with distilled water.
- Place the item in the ultrasonic bath with a fresh, jewelry-safe detergent.
- Run for a short cycle (2–3 minutes) and inspect.
- Dry and polish gently with a microfiber or silver cloth.
This approach avoids overexposure to vibration, minimizes chemical concentration in the tank, and often produces much better results than either method alone.
And remember—tarnish doesn’t appear overnight, and it doesn’t need to be removed aggressively. Layered, consistent care is the key to long-term brilliance.
How to Avoid Tarnish After Cleaning
You’ve cleaned your sterling silver to a brilliant shine—great. But if you don’t take a few extra steps now, that shine may not last.
The sad truth is that cleaning is only half the battle. Tarnish can creep back within weeks—or even days—if silver is exposed to air, moisture, or sulfur-containing materials (including certain papers, paints, and even rubber bands).
Here’s how to keep your silver tarnish-free longer:
After ultrasonic cleaning, make sure the piece is completely dry. Use a soft, absorbent cloth to pat it down, then let it air dry for 15–20 minutes before storing. Even the tiniest residual moisture can accelerate oxidation—especially if you’re storing the item in an enclosed space.
Next, consider your storage method. The best option is an anti-tarnish cloth or pouch, which absorbs sulfur compounds and slows the chemical reaction that causes tarnish. If you’re storing multiple items, wrap each one separately so they don’t rub or scratch each other.
For long-term storage, silica gel packets or activated charcoal pouches can help maintain a dry, stable environment inside jewelry boxes or silver chests.
A controversial—but often effective—method is anti-tarnish strips, like those made by 3M. These small tabs can be placed in drawers, pouches, or containers and help neutralize gases that cause tarnish.
And if you’re wearing your silver regularly, here’s a bonus: your skin’s natural oils actually help protect the metal. So don’t be afraid to wear your silver pieces often—they’ll stay cleaner longer with gentle, consistent use than they will sitting idle in a box.
At-Home Users: What to Know Before You Try It Yourself
If you’ve made it this far, you’re probably considering using an ultrasonic cleaner at home for your sterling silver. And that’s totally doable—but it’s not a “set it and forget it” kind of process.
Many consumer ultrasonic machines are built with versatility in mind. They can clean eyeglasses, coins, razor heads, and small tools, in addition to jewelry. That’s great—but sterling silver requires more thought than dropping a pair of glasses into a tank.
Start by choosing a machine with at least 40kHz frequency and a digital timer. Bonus points for models with temperature control or dual-frequency options (especially if you plan to clean different materials).
Read the manual. Seriously. The number of ultrasonic cleaner horror stories that start with “I didn’t read the instructions” is surprisingly high. Every brand is different, and using the wrong cleaning cycle or fluid can destroy a piece in under a minute.
And always test with a less sentimental or inexpensive silver piece first. This gives you a feel for the machine and lets you observe how it handles the metal and finish.
One more tip: don’t overcrowd the tank. Multiple items touching each other can cause micro-abrasions, especially in silver which is softer than gold or platinum.
When in doubt, consult your local jeweler before running a cherished family heirloom through an ultrasonic cleaning machine.
When to Skip Ultrasonic Cleaning and Use Manual Methods Instead
Ultrasonic cleaners are a great tool—but not every sterling silver item should be put into one. Sometimes, the old-fashioned methods are still the best.
If your silver jewelry includes:
- Soft or porous gemstones (like amber, turquoise, pearls)
- Glue-mounted parts
- Enamel or inlay work
- Antiqued or oxidized finishes
…then ultrasonic cleaning is not recommended. In these cases, a gentle hand-polish using a quality silver cleaning cloth is much safer. These cloths are pre-treated with mild abrasives that remove tarnish without harming surface detail or finishes.
For more stubborn cases, you can use a silver foam or cream polish—brands like Wright’s Silver Cream or Hagerty Silver Foam are widely recommended by professionals. These are applied with a damp sponge or cloth and gently worked into the metal before rinsing and drying.
There’s also the silver dip method, where the item is briefly submerged in a chemical bath that reacts with tarnish. These dips are powerful and fast—but also harsh. They can strip patinas or dull the finish if overused. If you use them, follow instructions to the letter and never combine them with ultrasonic cleaning.
Ultimately, the goal is to match the cleaning method to the item. A basic silver chain? Go ultrasonic. A 1920s brooch with enamel and marcasite? Manual cleaning, all the way.
Case Studies and Real User Experiences
To bring theory into real-world perspective, let’s look at some stories from users who’ve cleaned sterling silver in ultrasonic machines—with both good and bad outcomes.
On a jewelry repair blog, one jeweler described how a simple silver bracelet came out of the ultrasonic cleaner looking brand new—until the customer returned a week later. The bracelet had turned dull and yellowed. Turns out, the cleaner had used a high-pH solution meant for industrial use, which reacted with the copper in the alloy and left it discolored. It wasn’t noticeable immediately—but it surfaced after exposure to air and sweat.
In contrast, a hobbyist on r/SilverSmith shared how she cleaned over 50 handmade sterling silver rings using a 42kHz ultrasonic cleaner with mild dish soap and warm water. The results? Sparkling clean surfaces, no damage, and zero discoloration. Her secret? Low temperature, short cycles, and pre-rinsing.
Another case posted on a watch forum involved a sterling silver pocket watch chain with a gunmetal finish. The ultrasonic cleaner stripped the antiqued patina completely, leaving it shiny—but wrong. It was a stark reminder that finishes matter just as much as materials.
These stories drive home the point: the ultrasonic cleaner is only as safe as the person using it wisely. When used with care, it’s an excellent tool. Used carelessly, it’s a shortcut to costly regrets.
Future Tech: How Ultrasonics Are Evolving in the Jewelry World
As ultrasonic technology matures, newer features are being introduced that go far beyond the “one-button” operation of older models.
Some of the most promising innovations in silver-safe cleaning include:
- Multi-frequency machines that switch between 40kHz and 80kHz during a single cycle—great for gentle starts and deeper finishes.
- Pulsed ultrasonic modes, which alternate the power level to reduce surface stress and overheating risks.
- Tarnish-sensing solutions, which detect when silver sulfide is present and adjust the cleaning time accordingly.
- Mobile app integration, allowing users to monitor cycles, check water levels, and receive maintenance alerts from their phones.
- Self-degassing functions, which remove air from the water before cleaning to improve cavitation quality—something that’s surprisingly helpful for soft metals like silver.

In professional workshops, some ultrasonic systems are being combined with vacuum chambers, allowing air to be removed from fine jewelry before cleaning starts. This ensures better penetration of cleaning solution into intricate designs—perfect for filigree silverwork.
These innovations will likely filter down into home-use machines over time, making ultrasonic cleaning smarter, safer, and even more precise.
Final Thoughts: Shine Without Sacrifice
There’s something deeply satisfying about restoring the luster of sterling silver. Watching tarnish dissolve, grime disappear, and your favorite pieces come back to life—it’s like giving your jewelry a fresh start. And ultrasonic cleaners, when used correctly, offer one of the most efficient and rewarding ways to do just that.
But as with all powerful tools, the real secret lies in how you use them.
Sterling silver is strong—but not invincible. Its beauty lies in both its shine and its subtle imperfections. If ultrasonic cleaning helps you maintain that beauty more easily, it’s a tool worth having. Just don’t rush. Inspect, prepare, clean gently, and follow through with care.
Whether you’re a hobbyist restoring family silverware, a jeweler managing customer repairs, or someone just trying to keep your favorite ring looking its best, a little knowledge goes a long way. And a properly used ultrasonic cleaner can be a game-changer—bringing professional-level results to your own home, without the risk of damage or disappointment.
Shine on, but shine smart.