
Rubies have enchanted humans for millennia—revered by royalty, admired by collectors, and treasured by lovers. Their fiery red hue and legendary hardness make them one of the most popular gemstones in the world, second only to diamonds in durability. But even the toughest gems collect grime. Whether it’s skin oils, lotions, dirt from daily wear, or residue from years of being tucked in a box, a ruby’s glow can become dulled with time.
Enter the ultrasonic cleaner—a marvel of modern convenience. With its ability to scrub intricate surfaces down to a microscopic level using only sound waves and water, it has become a favorite in jewelry cleaning. Drop in your dull-looking piece, wait a few minutes, and retrieve it gleaming like new. The appeal is obvious.
But then comes the worry: Can I safely put my ruby ring in there? Will it crack? Will the stone come loose? Is all ultrasonic cleaning created equal?
The short answer is: it depends. While many rubies can indeed be cleaned safely using ultrasonic technology, not all rubies are the same—and therein lies the nuance.
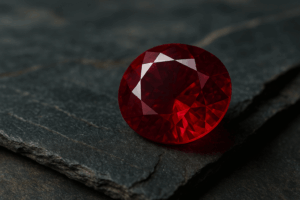
ruby
Understanding Ruby Composition: Why It Matters
To appreciate how rubies react in an ultrasonic environment, we need to first understand what they are, chemically and structurally. Rubies are a variety of the mineral corundum, composed primarily of aluminum oxide. Their stunning red color is due to the presence of trace amounts of chromium. On the Mohs scale of hardness, rubies score a 9 out of 10—meaning they are exceptionally resistant to scratching. For perspective, only diamonds (at 10) surpass them.
But hardness doesn’t equal invincibility.
The internal structure of a ruby—whether it contains fractures, inclusions, or has undergone treatment—can drastically change how it responds to ultrasonic waves. Imagine a flawless pane of glass versus one with a small crack. Both might look clear, but only one will shatter under pressure. The same principle applies to gemstones.
Some rubies, especially those that are untreated and of high clarity, are remarkably robust and can withstand ultrasonic cleaning without issue. But rubies with structural weaknesses or certain types of treatment can react very differently under the same conditions.
That’s where things get interesting—and risky.
Treated vs. Untreated Rubies: The Game-Changer
It’s a little-known fact among the general public that a large percentage of rubies on the market have undergone some form of treatment. Heat treatment is common and generally stable—it’s used to enhance color and clarity and has been accepted in the gem trade for decades. If your ruby has only been heat-treated, it’s likely safe to go into an ultrasonic bath, provided it has no visible fractures.
But then there’s the other kind: fracture-filled rubies, including those filled with lead glass. These are visually stunning at first glance—often appearing clearer and more vibrant than their untreated counterparts. However, they are far more delicate. The filler materials used to mask or heal fractures inside the stone are often far softer than ruby itself and can degrade or leach out when exposed to heat, vibration, or chemicals—all of which are present in an ultrasonic cleaner.
Imagine sending a ruby with tiny fractures filled with lead glass into a high-frequency sound bath. The cavitation process might not just shake off dirt; it might crack open the stone, dislodge the filling, or leave the surface looking cloudy and damaged.
That’s not just theoretical. Gemological labs around the world have documented such incidents. The Gemological Institute of America (GIA), for instance, has published guidance stating that “ultrasonic cleaning is not recommended for fracture-filled or cavity-filled gemstones,” including rubies.

For consumers, the challenge lies in knowing whether a ruby has been treated. Unfortunately, such treatments aren’t always disclosed at the point of sale—especially in online or unregulated markets.
If you’re unsure whether your ruby is untreated or fracture-filled, pause before dropping it into that cleaner. There are safer ways to go about it, which we’ll explore shortly.
How Ultrasonic Cleaners Work: A Simple Explanation
At first glance, ultrasonic cleaners might seem like magic. Just fill the tank, press a button, and a few minutes later, your items emerge sparkling clean. But there’s real science behind the process—and understanding it helps us grasp why some rubies thrive in these devices while others may not.
Ultrasonic cleaners operate by generating high-frequency sound waves—usually in the 20kHz to 200kHz range—within a liquid-filled tank. These sound waves produce microscopic bubbles through a process called cavitation. When these bubbles collapse or “implode,” they release a burst of energy, creating tiny shockwaves that scrub away dirt, oil, and grime from surfaces.
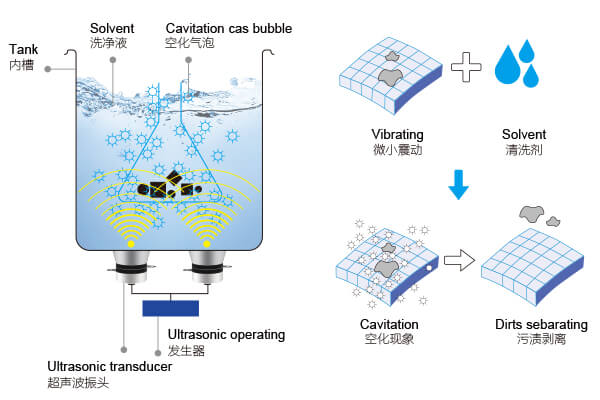
The Principle Behind Ultrasonic Cleaning
What makes this technology so compelling is its ability to penetrate tiny crevices and tight spaces that brushes or cloths simply can’t reach. It’s especially useful for cleaning intricate jewelry settings, where grime tends to accumulate.
However, the same powerful vibrations that make ultrasonic cleaners so effective can also be their greatest danger—especially when fragile or treated materials are involved. Cavitation doesn’t discriminate. If a stone has a microfracture or a filling inside, those shockwaves may amplify the flaw rather than just clean the surface.
Additionally, ultrasonic cleaners often include heating elements to raise the temperature of the cleaning solution, enhancing its effectiveness. While gentle warmth can boost cleaning efficiency, excessive heat can destabilize certain gem treatments or weaken adhesives used in jewelry settings.
That’s why understanding how the cleaning method works is crucial—it’s not just the gemstone itself, but the context in which it’s being cleaned that determines safety.
When Rubies Are (and Aren’t) Safe in Ultrasonic Cleaners
So when exactly is it safe to clean a ruby using ultrasonic waves?
Let’s begin with the good news: untreated rubies with excellent clarity and no surface-reaching fractures are generally safe in an ultrasonic cleaner. These rubies are structurally sound, heat-resistant, and composed of a single, solid material. Jewelers and gemologists often clean high-quality rubies this way, especially in commercial environments where efficiency is key.
But that’s the ideal scenario. And in real life, most rubies—especially those found in the mass market—don’t fall into that category.
Here’s where it gets more nuanced. If your ruby has any of the following traits, ultrasonic cleaning is not recommended:
- Fracture-filling with substances like glass, lead-glass, or resin.
- Large surface-reaching inclusions visible to the naked eye or under magnification.
- An antique setting where the ruby has endured years of wear and tear.
- A porous or composite structure, where the stone may be a mix of materials.
In some cases, even heavily included but untreated rubies should be avoided in ultrasonic machines. The internal pressure from cavitation can exploit natural flaws, leading to chips or cracks that didn’t exist before.
Jewelers will often use a 10x loupe or microscope to examine stones before placing them in an ultrasonic bath. If in doubt, they’ll err on the side of caution—especially for one-of-a-kind or sentimental pieces.
There’s also the mounting to consider. Is your ruby part of a vintage ring with a delicate prong setting? Are there other stones nearby that may react poorly, like emeralds or pearls? If so, the ultrasonic cleaner may not be the right choice, even if the ruby itself is structurally sound.
How to Test If Your Ruby Is Suitable for Ultrasonic Cleaning
If you’re unsure whether your ruby has been treated—or if it’s structurally sound—there are ways to reduce risk before committing it to a bath of ultrasonic waves.
First, check your documentation. If your ruby came with a gemological certificate from a trusted authority like the GIA (Gemological Institute of America), AGS (American Gem Society), or IGI (International Gemological Institute), it will indicate whether any treatments have been applied. Specifically, look for terms like “lead-glass filled,” “fracture-filled,” or “composite stone.” Any of these are immediate red flags.
But what if you don’t have documentation?
Use a jeweler’s loupe (10x magnification) or visit a local jeweler for inspection. Under magnification, filled fractures often show a web-like pattern, or they may flash in an unnatural way—sometimes called a “flash effect.” If light bounces around inside the ruby in odd colors or patterns, it could be due to fillers.
Also, inspect the ruby’s surface. Are there tiny bubbles or hazy-looking inclusions that don’t appear crystalline? These may indicate filling or structural instability.
In general, the following conditions suggest it’s safe to proceed with ultrasonic cleaning:
- The ruby is confirmed untreated or only heat-treated.
- The stone shows no surface-reaching cracks.
- The setting is sturdy, and no delicate or incompatible materials (like glue, enamel, or softer gems) are nearby.
Still not sure? Do a patch test using a non-ultrasonic method. Soak the ruby in warm water with a mild dish soap and gently scrub it with a soft toothbrush. If it handles this basic cleaning well, you’re off to a good start—but remember, it’s not a guarantee for ultrasonic safety.
When in doubt, consult a certified gemologist. A short visit could save a precious gem from irreversible damage.
Professional Guidelines: What GIA, AGS, and Others Say
The safest path to ultrasonic cleaning success is to heed the wisdom of professionals—those who study gem materials and witness firsthand what can go wrong.
The Gemological Institute of America (GIA) provides some of the most authoritative guidance on gemstone care. Regarding rubies, their position is clear:
“Do not use ultrasonic or steam cleaners on rubies that have been fracture-filled or dyed. These treatments can be damaged by heat and vibration.”
This guidance is also echoed by the American Gem Society (AGS), which includes ultrasonic use on rubies in its gem care guidelines. They advocate caution and recommend avoiding ultrasonic cleaners altogether unless the ruby has been evaluated and deemed untreated and stable.
Even major jewelry retailers like Blue Nile, James Allen, and Tiffany & Co. explicitly caution customers about cleaning treated rubies in ultrasonic machines. Most will recommend a soft cloth or warm soapy water as the default.
Meanwhile, manufacturers of ultrasonic cleaning equipment such as Branson Ultrasonics, Elma Ultrasonic, and SharperTek all include gemstone safety warnings in their user manuals, particularly when it comes to filled or composite stones. While they endorse ultrasonic use for diamonds and sapphires, rubies often come with a big asterisk.
Professional jewelers often rely on this expert consensus to guide their in-store cleaning protocols. In most retail environments, ruby jewelry is visually inspected under magnification before being placed in an ultrasonic bath. That alone tells you something: even pros don’t clean blindly.
Safe Cleaning Alternatives for Treated or Fragile Rubies
Not all rubies are suited for ultrasonic cleaning, but that doesn’t mean you’re stuck with dull, dirty stones. There are safer, gentler ways to clean rubies—especially those that are fracture-filled, dyed, or antique pieces with historical value.
The most reliable method? Warm water and mild dish soap. Add a few drops of a gentle, non-citrus soap into a bowl of warm (not hot) water. Let your ruby jewelry soak for about 10 to 15 minutes, then use a soft-bristled toothbrush to gently remove any grime. Be cautious around the setting, especially if your piece is vintage or has intricate prongs. After scrubbing, rinse under lukewarm water and pat dry with a lint-free cloth.
If your ruby is mounted alongside other delicate stones—such as opals, turquoise, or pearls—you should use extra care, as these stones are even more vulnerable to both abrasion and moisture. Avoid soaking altogether and instead opt for a soft, damp cloth to wipe the jewelry clean.
For high-value or sentimental items, a better option may be to take them to a professional jeweler. Many jewelry stores offer in-house cleaning services that involve ultrasonic machines—but more importantly, they know when not to use them. A jeweler can assess your ruby, detect any hidden weaknesses, and choose the appropriate cleaning method.
There are also commercial jewelry cleaning solutions available for home use. Some of these are designed specifically for soft or treated gemstones and come with clear instructions and soft tools. Brands like Connoisseurs or Hagerty make ruby-safe formulas, but always read the label carefully.
Avoid harsh chemicals like ammonia, bleach, or alcohol-based cleaners. These can strip away surface treatments or interact poorly with filler materials, causing permanent cloudiness or discoloration.
When cleaning at home, always work over a padded surface or a bowl—not an open sink. You’d be surprised how many precious stones are lost down the drain due to one slip of the hand.
Best Practices for Using an Ultrasonic Cleaner with Rubies
Let’s say you’ve done your homework. Your ruby is untreated, eye-clean, and professionally assessed as stable. You have a quality ultrasonic cleaner, and you’re ready to go. How do you ensure a safe and effective cleaning process?
Start by selecting a gentle cleaning solution. Avoid strong solvents or ammonia-based mixtures. Instead, opt for a commercial ultrasonic cleaning fluid specifically labeled as safe for natural gemstones. If you’re unsure, a 1:5 mixture of mild dish soap and water works as a basic alternative.
Before placing the ruby into the machine, ensure it’s mounted securely and that no loose prongs or settings are visible. A shifting stone can vibrate too aggressively, leading to accidental chipping.
Use the basket or tray that comes with your ultrasonic cleaner to suspend the jewelry in the tank. Never let it touch the bottom directly, as this can interfere with the cavitation process and increase the risk of damage from reflected shockwaves.
Set the ultrasonic cleaner to a moderate frequency—typically around 40kHz, which is gentler than industrial models that operate at 25kHz. The cleaning cycle should be brief: 1 to 3 minutes is often enough. More time doesn’t necessarily mean a better result and could increase the risk of micro-damage over time.
After the cleaning cycle finishes, remove the jewelry carefully and rinse it thoroughly under clean, lukewarm water. This removes any residual solution, which, if left on, can leave a film or cause chemical buildup over time. Finally, dry with a microfiber cloth or air-dry on a clean towel.

Ultrasonic Cleaning Basket
If you plan to clean multiple ruby pieces, change the solution periodically. Dirty solution loses its effectiveness quickly, and grime from one item can easily deposit onto another.
Used properly, an ultrasonic cleaner can restore a natural ruby’s brilliance to showroom levels. But it’s never a one-size-fits-all tool. Treat your rubies with knowledge and respect, and they’ll sparkle for generations.
Common Myths About Ultrasonic Cleaning and Rubies
Walk into any gemstone enthusiast forum or jewelry group, and you’re bound to find conflicting advice about ultrasonic cleaning. Some insist it’s perfectly safe, others warn it’s the path to destruction. As with many things in life, the truth lies somewhere in the middle—and understanding the nuances can protect both your gemstone and your peace of mind.
One of the most common myths is that all rubies are tough enough to handle anything, including ultrasonic waves. After all, they rank 9 on the Mohs hardness scale—second only to diamonds. While that’s true in terms of scratch resistance, hardness is not the same as durability. A glass-filled ruby may be hard on paper but fragile in real-world conditions due to internal structural flaws or treatments that react poorly to vibration and heat.
Another myth? That if a gemstone looks clean, it is clean. In reality, rubies—especially those worn regularly—can accumulate grime in microscopic fissures or under prongs where soap, skin oil, and lotion gather invisibly. This is precisely what makes ultrasonic cleaners appealing: they reach places traditional brushing can’t. But again, effectiveness doesn’t justify reckless use, especially with treated stones.
There’s also the belief that ultrasonic cleaning is faster and better by default. While it’s certainly convenient, that speed can be a double-edged sword. Just a few minutes of cavitation can do more harm than good if you haven’t properly assessed the stone. A manual cleaning might take a few minutes longer, but for treated or sentimental rubies, it’s often the smarter choice.
And finally, many consumers think that jewelers always use ultrasonic cleaners, so it must be safe. The truth is, professional jewelers often perform risk assessments before cleaning, and they understand which stones are safe to clean this way and which are not. What works in a controlled shop with decades of experience doesn’t always translate to a DIY cleaning at home.
What to Do If Your Ruby Gets Damaged
Even with all the right precautions, accidents happen. Maybe you didn’t know your ruby was filled. Maybe a small flaw escaped notice. If your ruby gets cloudy, cracked, or chipped after ultrasonic cleaning, don’t panic—but act quickly.
Start by removing the piece from circulation. Continuing to wear a damaged ruby can worsen the issue, especially if it’s mounted in a ring that’s subject to regular impact.
Next, take it to a certified gemologist or professional jeweler for inspection. In some cases, what looks like damage may just be residue from the cleaning solution, which can be safely removed. In other situations, particularly with fracture-filled stones, the filler may have leaked or changed color.
If the stone is a composite ruby, there’s usually not much that can be done to restore it fully, as the filling process is irreversible. However, depending on the mounting and sentimental value, a jeweler may be able to replace the stone with a natural untreated ruby or suggest repurposing the jewelry design.
For cracked or chipped natural rubies, repair options are limited. Some stones may be recut or polished to remove minor flaws, but this can change the appearance and weight of the gem. Still, a well-executed recut can restore both beauty and structural integrity.
Regardless of the damage, don’t attempt to fix it yourself using home remedies or adhesives. This almost always worsens the problem and reduces your chances of a successful professional repair.
Final Thoughts and Practical Takeaways
Cleaning rubies with an ultrasonic cleaner isn’t a simple yes-or-no question. It’s a nuanced decision that depends on the ruby’s treatment status, structural integrity, and even the setting in which it’s mounted. For untreated, natural rubies with no visible fractures, ultrasonic cleaning can be a safe, effective, and satisfying way to restore brilliance.
But for the many rubies on the market that are fracture-filled, dyed, or composite in nature, caution is key. These stones may look stunning, but they’re far more vulnerable to heat and vibration than their untreated counterparts.
The good news? A bit of awareness goes a long way. Whether you’re a jewelry collector, gem hobbyist, or simply trying to maintain a cherished heirloom, understanding your ruby and treating it accordingly can ensure it sparkles beautifully for years to come.
And if you’re still unsure, remember: a professional jeweler or gemologist is just a phone call away. When in doubt, seek expert eyes before engaging ultrasonic power.