
Keeping instruments clean—especially in fields like healthcare, laboratories, and manufacturing—isn’t just about appearances. It’s about hygiene, safety, and precision. Ultrasonic cleaning has become a trusted technique for tackling complex instrument cleaning needs because it reaches places manual scrubbing can’t. But to use it properly, and to get the results you expect, both technique and the choice of solution matter.
Understanding the Fundamentals of Ultrasonic Cleaning
The Principle Behind Ultrasonic Cleaning
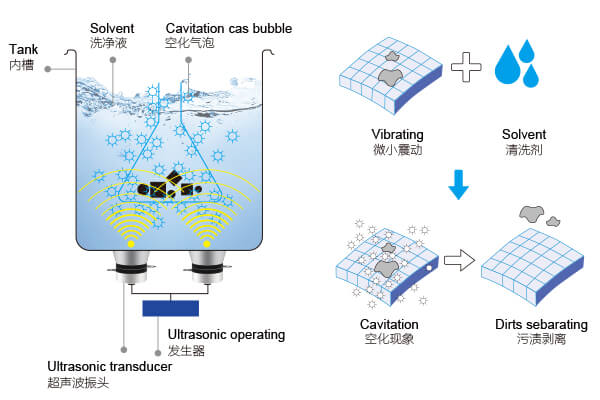
At its core, ultrasonic cleaning is a science-driven process built on the principles of physics—particularly the phenomenon of cavitation. When high-frequency sound waves, typically ranging from 20 kHz to 80 kHz, are introduced into a liquid medium, they cause rapid pressure fluctuations. These fluctuations form microscopic vacuum bubbles that grow and collapse violently in what’s known as the cavitation effect.
Unlike mechanical brushing or abrasive techniques, ultrasonic energy works uniformly across all submerged surfaces, regardless of shape or complexity. This makes it ideal for cleaning surgical instruments, dental tools, precision mechanical parts, and delicate laboratory equipment. The process is inherently non-abrasive and doesn’t rely on physical contact, which helps preserve the structural integrity and finish of fragile or high-value items.
The frequency of the ultrasonic waves determines the nature of the cleaning. Lower frequencies (like 25–30 kHz) produce larger bubbles with more forceful collapses, suitable for heavy-duty degreasing or carbon removal. Higher frequencies (60 kHz and above) generate gentler, smaller bubbles that are perfect for fragile instruments or microelectronics where aggressive cleaning could cause damage.
Ultimately, understanding these fundamentals allows users to tailor their ultrasonic cleaning systems to specific tasks—choosing the right frequency, solution.
Choosing the Right Cleaning Solution for the Job
Not all contaminants are created equal—and neither are the solutions that remove them. The cleaning agent used in an ultrasonic bath plays a critical role in the outcome.
Neutral pH enzymatic solutions are ideal for medical and dental instruments, especially those exposed to organic debris like blood and tissue. Enzymes break down proteins and fats without harming metal or plastic components.
Mild alkaline solutions are a better match for industrial tools, removing oils, carbon deposits, and machining residues. These must be carefully measured, as higher alkalinity can damage sensitive parts.
Specialty solutions—like those designed for optics or electronics—typically have anti-static or no-residue formulations to protect coatings or circuits. For high-risk or high-sensitivity applications, always consult manufacturer guidelines.
Best Practices for Safe and Effective Ultrasonic Cleaning
Success in ultrasonic cleaning isn’t just about pushing a button. Several factors determine whether the process is safe and thorough.
Always pre-rinse heavily soiled items to reduce bio-burden and avoid contaminating the entire solution. Use a mesh basket to suspend instruments in the tank; contact with the tank floor can cause vibration damage or “hot spots.” Ensure instruments are fully submerged and avoid overcrowding. If tools are stacked too tightly, ultrasonic waves can’t flow evenly—leaving behind invisible contamination, especially in hinges or serrated edges.
Temperature also matters. Enzymatic cleaners usually perform best around 37–45°C. Alkaline degreasers may benefit from slightly higher temperatures, but be careful not to damage heat-sensitive items. Some materials, such as certain plastics or adhesives, can soften or deform when exposed to temperatures above 60°C.
Cleaning cycles typically last 5–15 minutes, depending on the instrument type and soil level. Extending beyond necessary duration doesn’t improve cleanliness and may result in premature wear of delicate instruments. Regularly degassing the solution before cleaning is also important—it removes trapped air that could otherwise dampen cavitation intensity.
Periodic testing with foil tests or cavitation verification strips helps confirm the cleaner is operating at optimal power. Establishing this as part of a regular maintenance protocol ensures consistent cleaning performance and equipment longevity.
Below is a video of laboratory glassware being cleaned using an ultrasonic cleaner for your reference:
The Importance of Rinsing and Drying
Ultrasonic cleaning removes contaminants, but residue from the cleaning solution itself can remain. Instruments must be thoroughly rinsed with distilled or deionized water after cleaning. For surgical or diagnostic tools, this step is critical in preventing patient infection or chemical interference. Even small residues of enzymatic or alkaline solutions can disrupt test results or trigger adverse reactions in sterile settings.
Ideally, rinsing should occur in at least two stages: a primary rinse to remove most residues, and a secondary rinse using high-purity water to eliminate trace ions or surfactants. In some environments—such as pharmaceutical labs or microelectronics manufacturing—ultrafiltration systems may be used to ensure absolute purity.
Drying should be done using lint-free cloths or in drying cabinets. Avoid letting instruments air-dry in humid environments, which can promote corrosion. Heat-assisted drying around 60°C is generally safe for most metals and helps prevent spotting. However, optical components, rubber seals, or low-melt polymers should be dried with gentle airflow at ambient temperature or in vacuum chambers.
Post-drying, it’s best practice to store instruments in clean, dry containers with protective liners. For medical instruments, packaging should comply with sterilization standards (such as ISO 11607) to ensure the instrument remains contaminant-free until its next use.
Yunyisonic: A Reliable Partner in Instrument Care
For professionals seeking quality ultrasonic cleaning with versatile application, Yunyisonic offers exceptional value. With dual-frequency、triple-frequency and four-frequency designs, Yunyisonic systems handle both delicate and heavy-duty tasks without compromise. Their solutions cover medical, lab, and industrial environments alike, with customizable tanks, efficient heating controls, and optional oil filtration systems.
What sets Yunyisonic apart is not just the hardware—it’s the integrated support. From advising on cleaning chemistry to helping you optimize workflows, Yunyisonic ensures that what you clean is not just “clean enough”—it’s safe, protected, and ready for critical use.


Final Thoughts
In the pursuit of sterility, precision, and safety, ultrasonic cleaning offers more than just a convenient solution—it offers confidence. Whether you’re handling surgical tools in an operating room, maintaining dental instruments in a clinical setting, or preparing glassware for analytical testing, the stakes are high and the margin for error is razor-thin. In such environments, guesswork simply isn’t an option.
Properly leveraging ultrasonic technology means going beyond turning on a machine. It requires thoughtful consideration of cleaning chemistry, exposure duration, temperature, and post-cleaning protocols. It demands an understanding of what you’re cleaning, what contaminants you’re dealing with, and how each variable in the process contributes to the final outcome.
What separates successful cleaning from a compromised one often comes down to the details: Did you choose a solution that respects the material composition of your instruments? Did you allow enough time for complete cavitation? Was the rinse thorough enough to prevent chemical carryover? Was the drying phase sufficient to avoid corrosion or microbial regrowth?
By approaching ultrasonic cleaning with the same diligence as any other part of your workflow, you create a controlled and reproducible cleaning process that not only safeguards your equipment but also upholds the integrity of every procedure that follows.