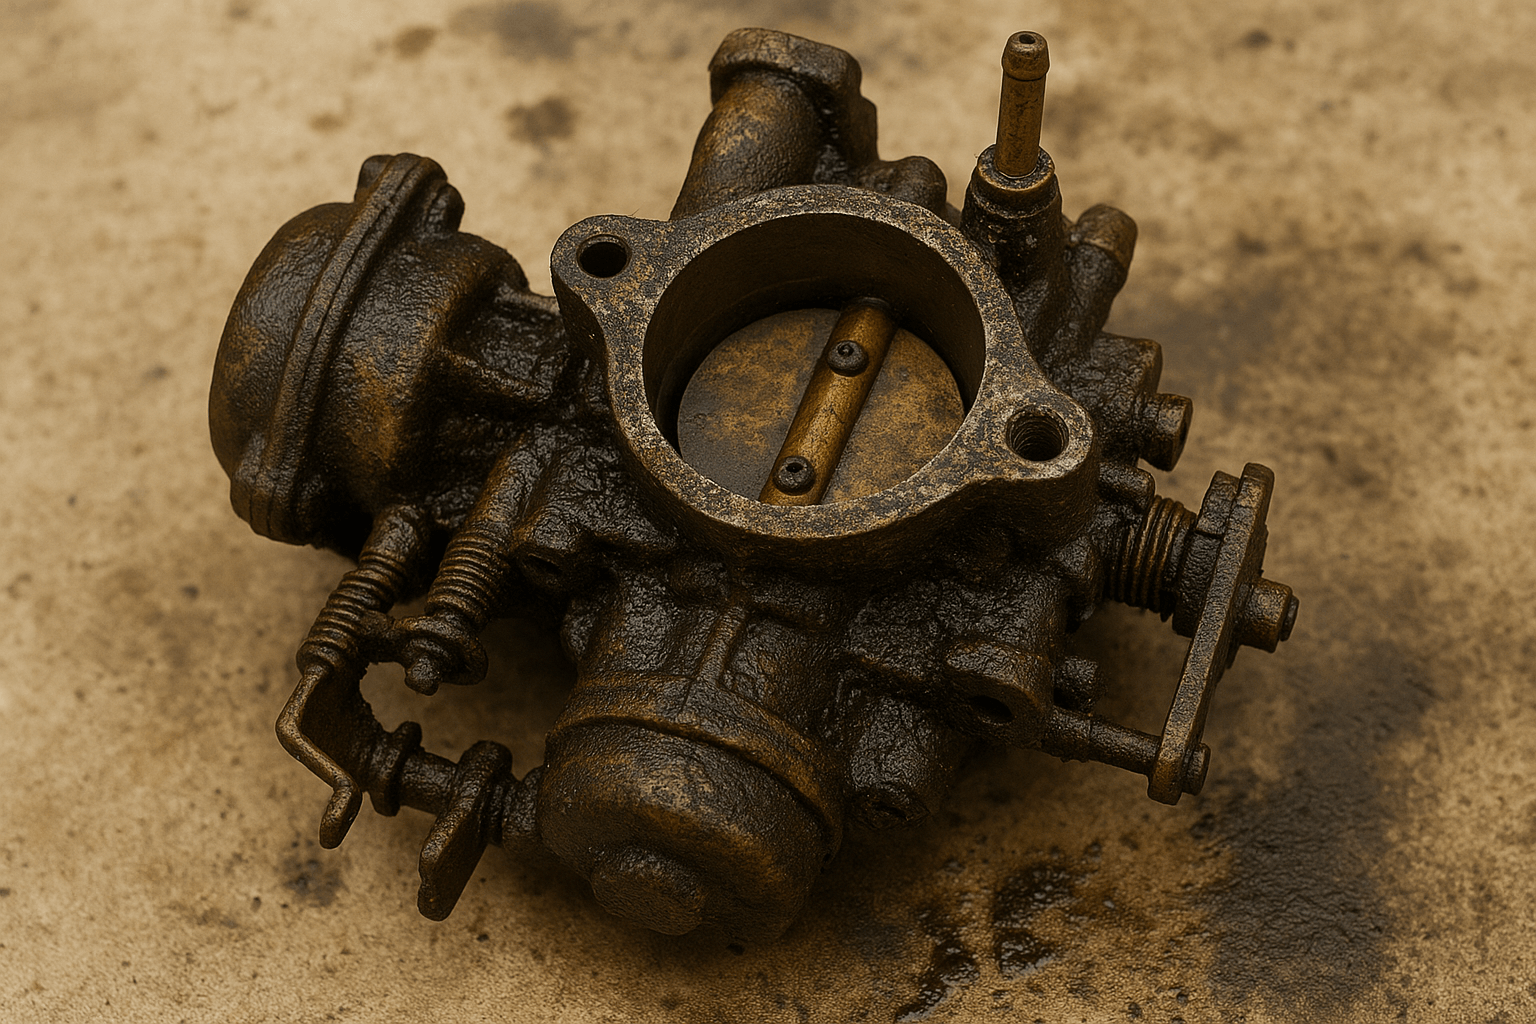
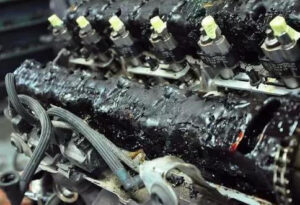
Cleaning carburetors with ultrasonic machines has revolutionized the way small engine maintenance is handled. Traditional methods like soaking in solvents, hand-scrubbing with brushes, or blasting with aerosol sprays can help to some extent—but they often fall short when it comes to loosening baked-on varnish, carbon buildup, and grime tucked deep within jets, passageways, and needle valves. Ultrasonic cleaning, on the other hand, uses high-frequency sound waves to produce microscopic cavitation bubbles that collapse with force, reaching every hidden crevice. This allows for a level of cleanliness that’s nearly impossible to achieve manually. However, the effectiveness of this technology depends heavily on the cleaning solution you use—because without the right chemistry, even the most advanced ultrasonic cleaner can deliver underwhelming results. Choosing the appropriate solution is what turns this process from good to exceptional.
Why the Right Cleaning Fluid Matters
Ultrasonic cleaning relies not just on the machine’s power but on the chemistry that enhances it. The fluid you choose becomes the carrier of the entire cleaning process. Cavitation—those tiny collapsing bubbles generated by ultrasonic waves—dislodges grime physically, but without a suitable solution, the contaminants may simply resettle or remain partially intact.
For carburetors, which often contain deposits of carbon, varnish, oil residue, and even rust, the fluid must do more than just rinse. It should chemically break down and emulsify stubborn residues, helping the bubbles lift debris from even the most intricate internal channels. A good solution improves surface wetting, increases the reach into tight spaces, and prevents corrosion during and after the cycle.
The right formulation also protects your parts. Aluminum, brass, and rubber gaskets can be sensitive to high alkalinity or acidity, so compatibility is critical. Choose a solution that’s biodegradable or low in VOCs if you’re working in enclosed spaces or care about environmental safety. Ultimately, the wrong fluid will waste your time; the right one makes cleaning efficient, effective, and safer for both components and users.
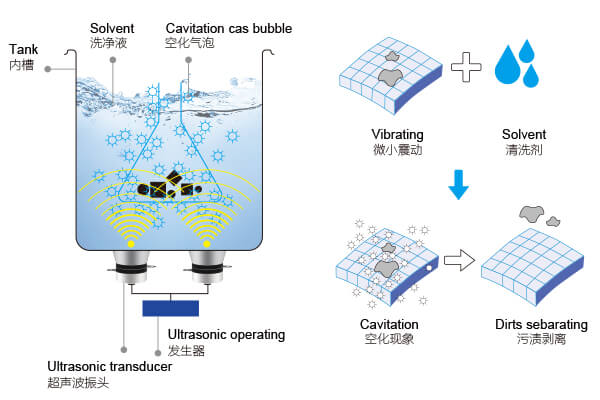
The Principle Behind Ultrasonic Cleaning
DIY-Friendly Ultrasonic Carb Cleaning Mixes
If you’re the hands-on type, making your own ultrasonic carb cleaning fluid can be both cost-effective and satisfying—provided you understand what works. The goal is to create a mix that breaks down oils, softens carbon deposits, and doesn’t damage metal or seals.
One popular formula includes distilled water mixed with a small amount of non-foaming degreasing dish soap, like those labeled “for automotive or industrial use.” Add baking soda or washing soda (sodium carbonate) for mild alkalinity, which helps dissolve organic deposits and neutralize acids.
For tougher build-up, a pinch of citric acid or white vinegar can be added to cut through corrosion—but be careful, especially with aluminum. Always test your mixture on a small part first and avoid chlorine-based cleaners, which can react with metals and leave behind residues.
You may also include a corrosion inhibitor post-cleaning or rinse the parts in a water-displacing oil to avoid flash rust. DIY solutions are perfect for hobbyists and light-duty tasks, but knowing their limits is key to avoiding damage or incomplete cleaning.

Cleaning fluid
Pro-Grade Ultrasonic Cleaner Fluids
When rigour matters—towards longer engine life or fleet maintenance—industrial-grade cleaner formulas bring strong benefits:
Solutions specifically designed for carburetors combine optimized surfactants, emulsifiers, and pH control. They remove varnish, gum, and carbon quickly—even at moderate temperatures—without causing corrosion.
Formulations labeled as “safe on all metals” are ideal since carb parts often mix aluminum, brass, steel, and zinc components. Many come concentrated (like 1:10 or 1:20) to save cost and reduce waste.
Some professional options include combined cleaning solution and ultrasonic equipment solutions offering matched compatibility and better overall performance .
Ultrasonic Cleaning Process Recommendations
Getting the most out of ultrasonic cleaning involves more than just tossing parts in a tank. Here’s how to do it properly:
Start by disassembling the carburetor completely. Remove all gaskets, rubber O-rings, and non-metal components unless you’re sure your cleaning solution is safe for them. The more accessible the surfaces, the better the result.
Next, prepare the cleaning solution. Whether you’re using a homemade mix or a professional-grade fluid, follow the concentration recommendations carefully. Overly diluted mixtures reduce effectiveness, while overly concentrated ones can damage sensitive materials.
Set the temperature between 50°C and 65°C (122°F to 149°F) for optimal cleaning of oily and carbon-contaminated parts. This temperature range activates most chemical additives while supporting efficient cavitation.
Cycle time usually ranges from 10 to 20 minutes depending on the contamination level. If your parts are heavily soiled, consider running a pre-cleaning cycle, inspecting halfway through, and possibly replacing the solution before a second round.
After cleaning, rinse thoroughly in clean distilled water to remove any chemical residue. Then dry immediately using compressed air or a lint-free cloth. Avoid air-drying in humid environments, as flash rust can develop quickly on steel components.
A final optional step: soak parts briefly in a water-displacing oil or corrosion inhibitor to preserve metal surfaces until reassembly.
carburetor
Choosing Between DIY vs. Professional Solutions
Deciding whether to mix your own cleaning solution or invest in commercial options depends on your needs, frequency of use, and the value of the parts you’re working with.
DIY solutions are excellent for light maintenance, occasional use, or budget-conscious users. They give you control over ingredients and can be surprisingly effective for simple deposits. However, their performance is generally lower than that of industrially formulated concentrates, especially when dealing with baked-on varnish or multi-metal assemblies.
Professional cleaning solutions, especially those designed for ultrasonic cleaning, are rigorously tested to ensure consistent results. They’re designed with proper surfactants, corrosion inhibitors, and buffering agents that maintain pH balance and long-term stability. For anyone cleaning carburetors regularly—like automotive shops or serious hobbyists—the time saved and consistency gained may far outweigh the cost.
Still unsure which way to go? Start with a DIY mix and monitor the results. If cleaning takes longer or leaves residues behind, it might be time to scale up to professional-grade chemistry for more demanding applications.
Final Considerations for Cleaner Carbs
Proper carburetor maintenance improves fuel efficiency, reduces emissions, and extends the lifespan of your engine—making ultrasonic cleaning an excellent investment. But even the best solution needs a reliable machine to match.
This is where Yunyisonic ultrasonic cleaners shine. Designed with multi-frequency configurations, intelligent degassing modes, and powerful cavitation performance, Yunyisonic units bring industrial-level results to workshops and home garages alike. Whether you’re cleaning small-engine carburetors or handling multi-part batches, Yunyisonic equipment is engineered for consistent, damage-free results. The stainless steel tanks are durable and corrosion-resistant, while the customizable cleaning parameters make them adaptable to various carb types and materials.
With the right solution paired with Yunyisonic’s advanced cleaning systems, you’re not just removing dirt—you’re restoring performance, preventing future problems, and upgrading your entire maintenance workflow.
If you plan to clean the carburetor, and you need to buy an ultrasonic cleaner to solve this problem, you can choose the following products:
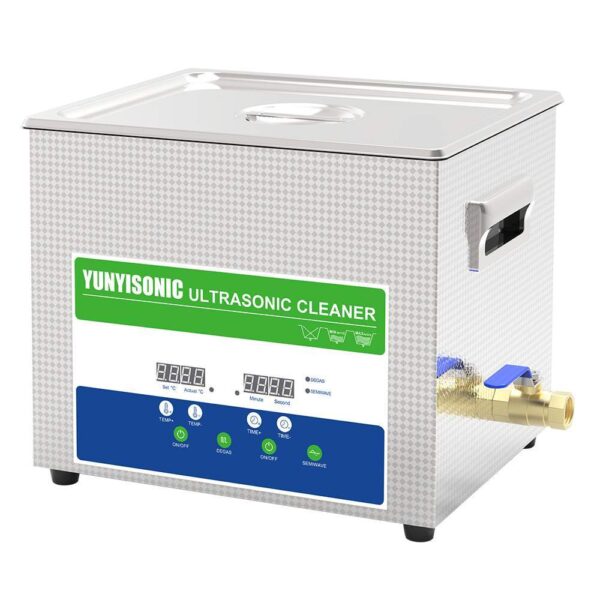
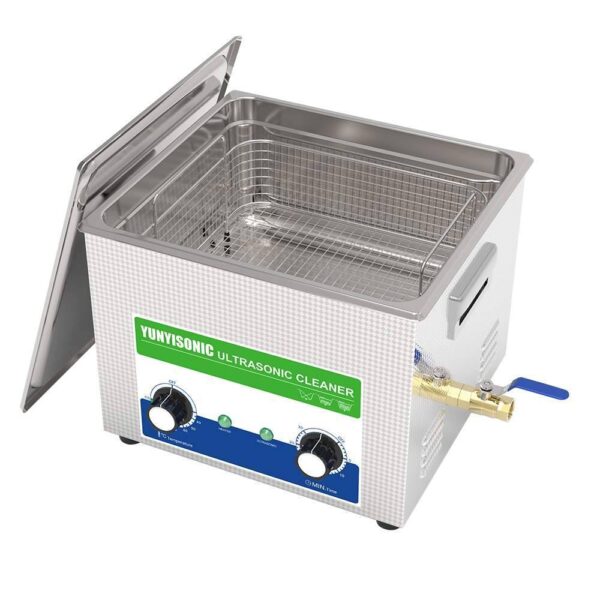
10L Digital Ultrasonic Cleaner for Carburetors 40kHz SUS304 with Timer, Heating
In stock
| Volumetric Weight | 11.0 kg |
|---|---|
| Package Dimensions | 43.5 × 36 × 35 cm |
| Model | YW0410, YW0610 |
| Application Field | Aerospace, Aluminum, Autoparts, Car Parts, Carburetors, Coins, Dental, Engine, Gear, Laboratory, Print Head, Vessel, Watches |
| Brand | Yunyisonic |
| Origin | Shenzhen City, China |
| Capacity | 10L |
| Frequency | 40kHz |
| Power | 120/240W, 180/360W |
| Timer | 1-30mins |
| Heater | RT~80°C |
| Tank Material | SUS304 Stainless Steel |
| Voltage | AC 110V 60Hz;AC 220V 50Hz |
| Plug Type | AU Plug, EU Plug, Other Plugs, UK Plug, US Plug |
| Certificates | CE, FCC, ROHS |
| Warranty | 1 Year |
| Customization | Logo/Pattern, Private Lable, White Label |
| Function | Clean Thoroughly, Degassing, Digital Control, Heating, Semiwave, Timing |
| Manufacturer | Yunyisonic Shenzhen Co., Ltd. |
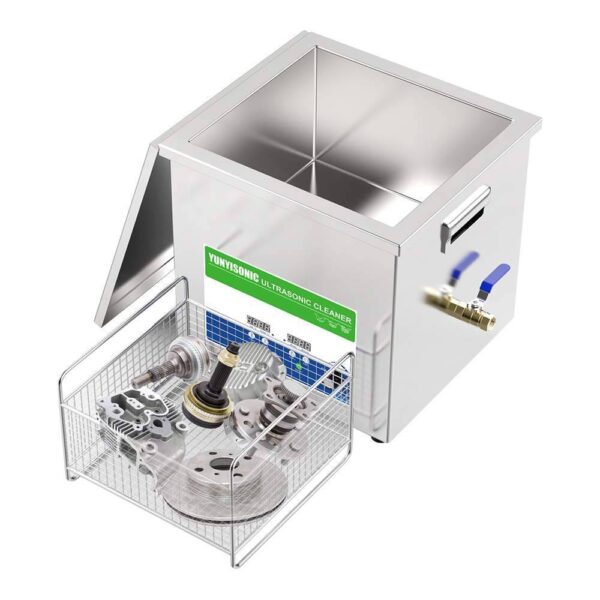
14-130L Industrial Ultrasonic Cleaner with Built-in Generator | Adjustable Power 28/40kHz for Engine Block Carburetor DPF Lab Cleaning
In stock
| Volumetric Weight | N/A |
|---|---|
| Package Dimensions | N/A |
| Model | YN0614, YN0820, YN1030, YN1240, YN1860, YN1868, YN2480, YN3613 |
| Application Field | 3D Manufacturing, 3D-Printed Parts, Additive Manufacturing, Aerospace, Aluminum, Autoparts, Aviation, Biopharmaceutical, Brass, Car Parts, Dental, Engine, Firearms, Hardware, Hospital, Industrial Use, Marine, Semiconductor, Surgical Instrument |
| Brand | Yunyisonic |
| Origin | Shenzhen City, China |
| Capacity | 130L, 14L, 20L, 30L, 38L, 58L, 68L, 78L |
| Frequency | 120kHz, 200kHz, 28kHz, 40kHz |
| Power | 0-1200W, 0-1800W, 0-300W, 0-400W, 0-500W, 0-600W, 0-900W |
| Tank Material | SUS304 Stainless Steel, T2.0mm |
| Housing Material | SUS201 T1.0mm |
| Voltage | AC 110V 60Hz;AC 220V 50Hz |
| Plug Type | AU Plug, EU Plug, Other Plugs, UK Plug, US Plug |
| Certificates | CE, FCC, ROHS |
| Warranty | 1 Year |
| Customization | Logo/Pattern, Private Lable, White Label |
| Function | Clean Thoroughly, Digital Control, Heating, Power Adjustable, Timing |
| Manufacturer | Yunyisonic Shenzhen Co., Ltd. |
15L Mechanical Ultrasonic Cleaner for Brass Carburetor and Engine Parts | Benchtop Automotive Cleaner with Drain Valve
In stock
| Volumetric Weight | 12.8 kg |
|---|---|
| Package Dimensions | 46 × 41 × 34 cm |
| Model | YD0615, YD0915 |
| Application Field | Additive Manufacturing, Aerospace, Autoparts, Biopharmaceutical, Coins, Contact Lenses, Dental, Industrial Use, Marine, Musical Instruments, Plastics |
| Brand | Yunyisonic |
| Origin | Shenzhen City, China |
| Capacity | 15L |
| Frequency | 40kHz |
| Power | 360W, 540W |
| Timer | 1-30mins |
| Heater | RT~80°C |
| Tank Material | SUS304 Stainless Steel |
| Voltage | AC 110V 60Hz;AC 220V 50Hz |
| Plug Type | AU Plug, EU Plug, Other Plugs, UK Plug, US Plug |
| Certificates | CE, FCC, ROHS |
| Warranty | 1 Year |
| Customization | Logo/Pattern, Private Lable, White Label |
| Function | Clean Thoroughly, Heater Knob Control, Heating, Timer Knob Control |
| Manufacturer | Yunyisonic Shenzhen Co., Ltd. |
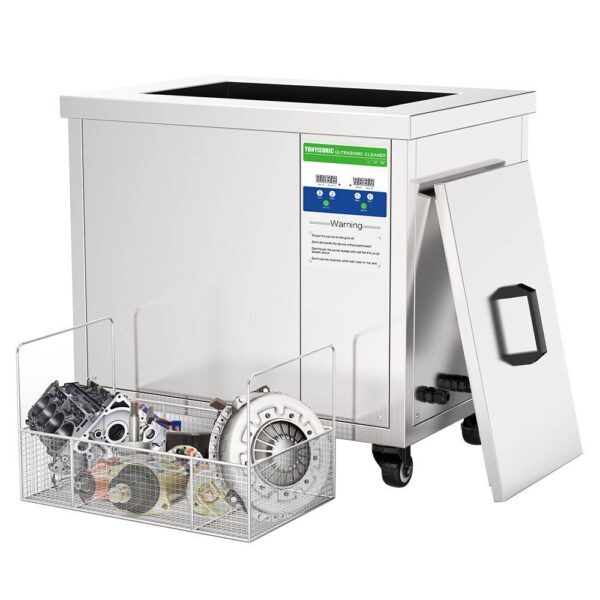
45L Industrial Ultrasonic Cleaner | Digital Power Adjustable for Auto Parts DPF Gears Engine Cleaning
In stock
| Volumetric Weight | N/A |
|---|---|
| Package Dimensions | N/A |
| Model | YM1240, YM1860, YM2480, YM30108, YML2480 |
| Application Field | 3D-Printed Parts, Additive Manufacturing, Aerospace, Aluminum, Autoparts, Aviation, Brass, Car Parts, Earrings, Firearms, Hardware, Industrial Use, Marine, Rings, Semiconductor, Surgical Instrument, Toys |
| Brand | Yunyisonic |
| Origin | Shenzhen City, China |
| Capacity | 108L, 45L, 61L, 88L |
| Frequency | 28kHz, 40kHz |
| Power | 0-1200W, 0-1500W, 0-600W, 0-900W |
| Tank Material | SUS304 Stainless Steel |
| Housing Material | SUS201 T1.0mm |
| Voltage | AC 110V 60Hz;AC 220V 50Hz |
| Plug Type | AU Plug, EU Plug, Other Plugs, UK Plug, US Plug |
| Certificates | CE, FCC, ROHS |
| Warranty | 1 Year |
| Customization | Logo/Pattern, Private Lable, White Label |
| Function | Clean Thoroughly, Digital Control, Heating, Power Adjustable, Timing |
| Manufacturer | Yunyisonic Shenzhen Co., Ltd. |