Jewelry isn’t just about aesthetics—it often carries the weight of personal stories, milestones, and cherished memories. A wedding band passed down generations, a birthday gift from a loved one, or a gemstone picked up on a special trip—each piece has emotional value that far exceeds its price tag. Yet, despite its resilience, jewelry is constantly exposed to elements that dim its brilliance. Everyday contact with skin oils, cosmetics, sweat, household chemicals, and even the air can leave residues that cloud its shine and hide its beauty.
To bring back that original luster, ultrasonic cleaners have become a trusted tool in both professional settings and homes. Their ability to remove grime from even the tiniest grooves without abrasion makes them ideal for delicate items like rings, earrings, and intricate necklaces. However, what often gets overlooked is the vital role of the cleaning solution used in the process. The solution doesn’t just sit there—it amplifies the effect of the ultrasonic waves, helping to dislodge dirt, dissolve oils, and protect the jewelry from potential damage during cleaning.
For those who prefer a more personal or eco-conscious approach—or simply want to save on commercial cleaning liquids—making a homemade ultrasonic cleaner solution can be a practical and rewarding alternative. When crafted carefully, DIY formulas can be tailored to suit different jewelry materials, from gold and silver to diamonds and delicate stones. They allow users to control ingredients, avoid harsh chemicals, and even introduce natural components that are gentler on both the items and the environment.
This growing interest in homemade solutions reflects not just a do-it-yourself spirit, but a thoughtful care for the things we treasure. Knowing exactly what goes into your cleaner gives you peace of mind—and better yet, it often delivers results that rival store-bought alternatives.
Understanding Ultrasonic Cleaning
The Principle Behind Ultrasonic Cleaning
Of all the modern methods to restore jewelry to its original brilliance, few are as effective or fascinating as ultrasonic cleaning. It’s a technology rooted in science but refined for elegance—offering a way to remove grime not just from visible surfaces but from the smallest crevices that brushes can’t reach.
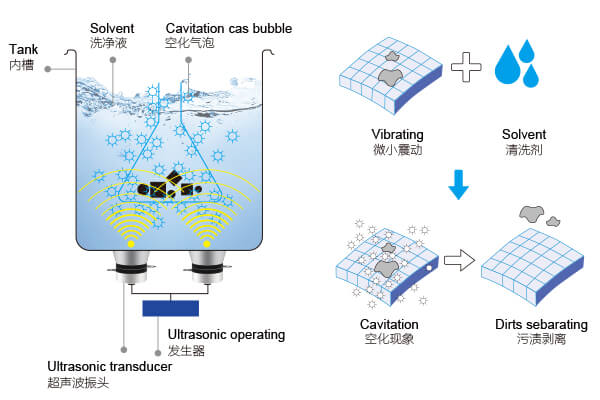
At first glance, ultrasonic cleaning may seem like a simple bath with bubbles—but it’s far more sophisticated than that. The process relies on high-frequency sound waves (typically 20–80kHz) that pass through a liquid medium, usually water mixed with a specialized cleaning solution. These sound waves generate microscopic vacuum bubbles in a phenomenon known as cavitation. As these bubbles collapse, they release a burst of energy that dislodges contaminants from even the most intricate surfaces.
What makes ultrasonic cleaning so effective for jewelry is its ability to reach areas traditional methods can’t—between prongs, inside engravings, or beneath settings. The cleaning action is non-abrasive and uniform, meaning it won’t scratch metals or loosen delicate stones. It doesn’t rely on brute force or harsh chemicals, but rather on precise, consistent energy that acts as a microscopic brush scrubbing every crevice at once.
This precision is particularly valuable for heirlooms or antique pieces, where preserving both beauty and structural integrity is critical. Instead of risking damage with manual cleaning or chemical soaks, ultrasonic technology offers a safer, more comprehensive approach—especially when paired with the right cleaning fluid.
Inspired Homemade Cleaning Solutions
Crafting a homemade ultrasonic cleaning solution requires a balance between efficacy and safety. Here are some popular DIY recipes:
Mild Dish Soap Solution: Combine 1 cup of warm water with a few drops of mild dish soap. This gentle solution is suitable for most jewelry types, including gold and platinum.
Ammonia-Based Cleaner: Mix 1 part ammonia with 6 parts water and add a few drops of dish soap. This solution is effective for gold and diamond jewelry but should be avoided for porous stones like opals or pearls.
Vinegar and Baking Soda Mix: For silver jewelry, a combination of 1/2 cup white vinegar and 2 tablespoons of baking soda can help remove tarnish. Ensure thorough rinsing after cleaning to prevent residue.
When using these solutions, it’s essential to rinse the jewelry thoroughly after cleaning to remove any residual solution, which could cause corrosion if left on the metal surfaces.


Best Practices for Ultrasonic Cleaning
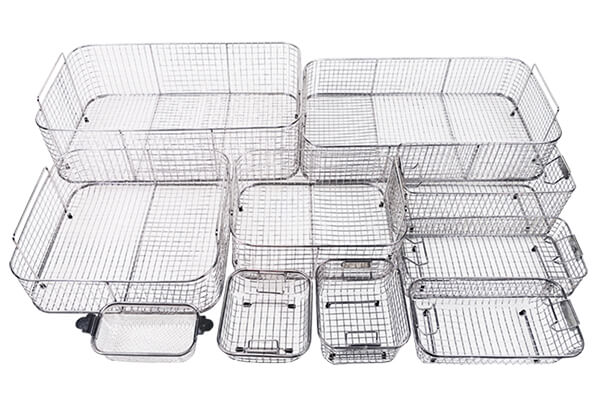
baskets
Using an ultrasonic cleaner isn’t just about tossing your jewelry into a tank and hitting the power button. To get optimal results and preserve your items, certain practices should become routine.
First, always make sure your jewelry is compatible with ultrasonic cleaning. While most gold, silver, platinum, and diamond pieces respond well, porous stones like opal, pearl, emerald, and turquoise should generally be avoided. These materials can absorb water or suffer microfractures under ultrasonic vibrations.
Temperature also plays a critical role. Most cleaning solutions work best between 40°C to 60°C. Too cold, and cavitation is weak; too hot, and some materials may warp or adhesives loosen. Additionally, ensure that pieces are placed on a basket or rack—not directly on the tank bottom—to allow the sound waves to circulate freely and avoid damage from vibration contact.
Timing matters, too. Jewelry with light soiling may only need 3 to 5 minutes, while pieces with stubborn buildup might benefit from 8 to 10 minutes. Leaving items in too long can lead to surface dulling or loosening of mounted stones.
Lastly, always rinse thoroughly with clean water after the cycle, and gently dry with a soft cloth. This step removes any residues and prevents spotting. By following these thoughtful steps, you not only maximize cleaning efficiency but also extend the life and brilliance of your jewelry.
Safety Considerations
While homemade solutions are convenient, it’s crucial to avoid certain substances:
Avoid Harsh Chemicals: Do not use bleach, acetone, or other strong chemicals, as they can damage jewelry and pose health risks.
Beware of Material Compatibility: Some solutions may not be suitable for certain gemstones or metals. Always test a small area first.
Proper Ventilation: Ensure the cleaning area is well-ventilated to avoid inhaling fumes from the cleaning solutions.
Choosing Between DIY and Professional Solutions
There’s a charm to mixing your own cleaning solution—customization, cost-savings, and control over what touches your treasured items. However, there are times when a commercial-grade solution is worth considering.
For example, if your jewelry has heavy tarnish, stubborn grease, or requires antibacterial treatment (as with post-piercing earrings), specialized commercial solutions may offer chemical agents that outperform homemade mixtures. These are lab-tested for specific metals and stones, often incorporating anti-tarnish agents or inhibitors that not only clean but protect.
Consistency is another reason. DIY solutions, while effective, can vary from batch to batch. In contrast, professional formulations deliver repeatable results every time—an important factor if you’re cleaning high-value items or running a small jewelry business.
And let’s be honest—not everyone wants to play chemist in their kitchen. If you’d rather skip the trial-and-error and ensure optimal performance, investing in a professionally formulated solution, especially when used in a high-quality ultrasonic cleaner, is a decision that balances convenience with reliability.
For those seeking professional results without professional hassle, pairing a trusted ultrasonic cleaning machine with a proven solution—such as those used in Yunyisonic’s high-performance devices—can bring peace of mind and sparkling results, minus the guesswork.