Silver is one of the most elegant metals we use in everyday life. Whether it’s antique flatware passed down through generations or a favorite pair of silver earrings worn on special occasions, silver’s cool luster holds an enduring appeal. But that beauty doesn’t come without a fight—tarnish is a constant and inevitable guest.
Unlike rust, which eats away at metal, silver tarnish is a surface-level reaction. It happens when silver comes into contact with sulfur-containing compounds in the air, in food, or even in human sweat. Over time, these compounds bond with the silver to form silver sulfide, a dark film that dulls and blackens the surface.
What makes cleaning silver especially tricky isn’t just the chemistry—it’s the design. Many silver items feature ornate patterns, filigree, crevices, or fine engraving where tarnish can hide. A polishing cloth might shine the surface, but what about the inner rings of a silver chain or the crevices in a repoussé vase?
Manual cleaning is not only labor-intensive but can be damaging. Over-polishing wears away soft silver over time, and commercial silver dips often contain strong chemicals that may strip off intentional patina or harm silver plating.
That’s why more people are turning to ultrasonic cleaners—compact machines that promise to lift away grime and tarnish using only sound waves and water. But does it really work for silver? And more importantly, is it safe?
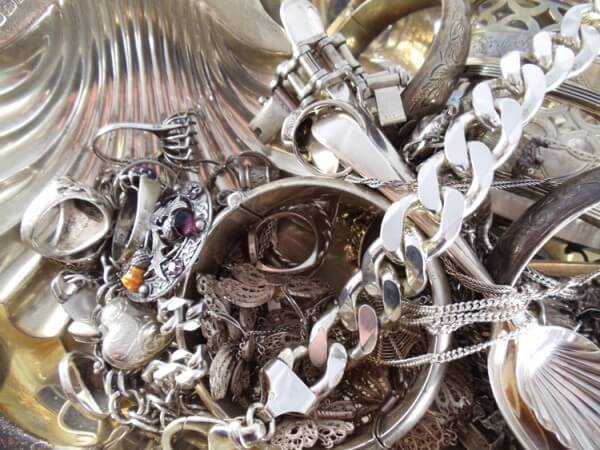
Silver Jewelry
What Is Ultrasonic Cleaning and How Does It Work on Metals?
Ultrasonic cleaning isn’t just a buzzword—it’s a scientific process trusted in fields ranging from medical sterilization to aerospace component cleaning. At its core, it uses sound waves beyond the range of human hearing (typically around 40,000 vibrations per second) to create microscopic bubbles in a liquid bath. These bubbles form and collapse so quickly that they produce tiny shockwaves, which gently dislodge contaminants from the surface of submerged items.
For metals like silver, this means that dust, oils, polishing residue, and even early-stage tarnish can be removed from every nook and cranny without scrubbing or scraping. This is especially valuable for intricately patterned items that are nearly impossible to clean by hand.
Unlike abrasive polishing or harsh chemicals, ultrasonic cleaning is non-contact and non-destructive—at least when done correctly. The cavitation process doesn’t grind the surface but rather peels away layers of grime that have settled on it.
And here’s the beauty of it: ultrasonic cleaning works even where your hands and tools can’t reach. The grooves of a chain bracelet, the underside of a serving spoon’s bowl, or the interior ridges of a silver ring—all of these become accessible through cavitation.
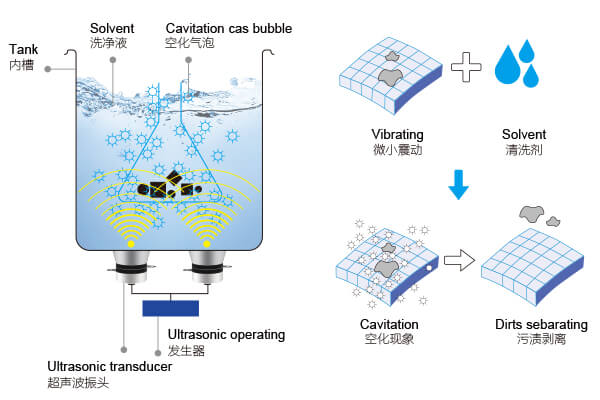
The Principle Behind Ultrasonic Cleaning
This all sounds great. But the key question remains: can an ultrasonic cleaner actually clean silver—and clean it well—without damaging it?
Can You Clean Silver in an Ultrasonic Cleaner?
Let’s not beat around the bush: yes, ultrasonic cleaners can clean silver. And when used properly, they can be remarkably effective—especially for detailed or intricate silver pieces.
But here’s the nuance: ultrasonic cleaning excels at removing dirt, grease, and loose tarnish, not necessarily the deeper, chemically bonded silver sulfide layers responsible for that blackened look on long-neglected items. For those cases, ultrasonic cleaning can assist, but it may need to be paired with a suitable cleaning solution designed for silver tarnish.
Ultrasonic cleaning is particularly useful when:
- You’re cleaning silver chains, rings, or earrings with tight grooves or fine details
- The tarnish is light to moderate, or combined with other contaminants like skin oil or polish residue
- You want to avoid abrasion or rubbing that could wear away delicate designs or silver plating
- You’re cleaning multiple items at once, like cutlery sets or batches of jewelry
However, it’s not a magic wand. If a piece is heavily oxidized, antique with dark patina that you want to preserve, or made from silver plate over a base metal, you’ll want to proceed with care. In some cases, ultrasonic cleaning may highlight imperfections, lift loose plating, or accelerate wear on already weakened components.
That’s why ultrasonic cleaning for silver isn’t a blanket “yes” or “no.” It’s a powerful tool—but like any tool, it depends on how you use it.

Understanding the Types of Silver and Their Behavior in Ultrasonic Baths
Before dropping any silver item into an ultrasonic cleaner, it helps to understand what kind of silver you’re dealing with. Not all silver behaves the same under ultrasonic cavitation. In fact, the type, purity, and construction of the silver item can make a big difference in both cleaning effectiveness and safety.
Let’s start with sterling silver, the most common form of silver used in jewelry, cutlery, and household decor. It’s made of 92.5% silver, alloyed with other metals (usually copper) to improve durability. Sterling silver typically responds very well to ultrasonic cleaning. It’s strong enough to handle the gentle vibration, and the remaining 7.5% of alloy doesn’t usually interfere with the process.
Then there’s fine silver—99.9% pure silver. This is more malleable and more prone to tarnish, but also less commonly used in wearable or functional items due to its softness. It too can be cleaned ultrasonically, though it may show minor surface rippling if exposed too long or to overly aggressive cycles.
Things get trickier with silver-plated items. These have a thin layer of silver over a base metal like brass or nickel. If the plating is thick and intact, ultrasonic cleaning is usually safe. But if it’s worn or already peeling, the cavitation process can loosen or flake the remaining silver layer. In such cases, you’ll want to avoid the ultrasonic bath unless you’re prepared to refinish the item.
Also worth noting: many antique or artisan silver items are oxidized on purpose, creating a rich, dark patina that highlights design details. Ultrasonic cleaning can sometimes lift this patina—especially if combined with the wrong cleaning solution—leaving a patchy or unintended shiny result. So, if the patina is part of the aesthetic, ultrasonic cleaning may not be appropriate.
Another caution involves multi-metal pieces. If your silver item includes gold accents, enamel, inlaid stones, or other metals, you must be certain all materials are safe for immersion and vibration. If not, it’s best to clean them manually or consult a jeweler.
Understanding your silver’s composition helps you make smart choices—not just about whether to use ultrasonic cleaning, but how to optimize it for the best results without risk.
The Chemistry of Silver Tarnish and How Ultrasonic Cleaning Helps
We often treat “tarnish” as a single problem, but chemically speaking, it’s a bit more complex. Tarnish on silver is caused primarily by silver sulfide, a compound that forms when silver reacts with sulfur-containing gases like hydrogen sulfide (H₂S) in the air. These gases are more common than we think—they’re in industrial pollution, household cleaners, rubber, even eggs.
The tarnish layer is usually just a few molecules thick, but it bonds tightly to the silver’s surface. Over time, as layers build up, the surface darkens from yellowish to brown, purple, blue, or black. If the silver is worn regularly, oils and friction may slow the tarnishing. But items stored away—like heirloom silverware or untouched jewelry—tarnish faster due to still air and trapped moisture.
So where does ultrasonic cleaning come in?
Ultrasonic cavitation can lift loose surface dirt, skin oils, polishing residues, and even early-stage tarnish. But it won’t chemically break down silver sulfide. In other words, if the blackening is advanced, ultrasonic energy alone won’t make the piece bright again. You’ll need to add a tarnish-specific solution to aid the reaction.
That said, ultrasonic cleaning does play an important role: it preps the surface for further cleaning. By removing oils and residues that would otherwise block chemical reactions, it improves the effectiveness of tarnish removers. In fact, many professionals use ultrasonic cleaning as a first step before applying silver dips or foils.
What’s more, ultrasonic waves can agitate and accelerate chemical reactions in the cleaning bath—especially when paired with baking soda or specialized silver detergents. This makes them doubly effective: mechanical vibration plus chemical softening.
Think of it like this: ultrasonic cleaning is the gentle persuader—it loosens what manual tools can’t reach and gets the silver ready to shine again.
Choosing the Right Ultrasonic Cleaning Solution for Silver
Now comes one of the most important decisions in ultrasonic silver care: what do you put in the tank?
While water alone can achieve decent results, adding the right cleaning agent can vastly improve effectiveness—especially when dealing with tarnish or oily buildup. But the wrong solution can damage your silver, coatings, or the cleaner itself.
Let’s start with what NOT to use:
- Ammonia: Too harsh. It can corrode silver, especially plated items, and damage surrounding materials like gemstones.
- Acids (vinegar, lemon juice): Can cause pitting or dullness on pure silver and often react poorly with solder joints.
- Bleach or chlorine compounds: Dangerous. These react chemically with silver and can ruin it permanently.
- Dishwashing liquids with perfume or moisturizers: They may smell nice, but they leave residues that dull the finish.
- Tap water: Contains minerals that interfere with cavitation and leave spots on the silver afterward.
Instead, opt for these safe and effective solutions:
- Baking soda + distilled water: A classic and gentle alkaline mix that softens tarnish and removes residue.
- Mild, ammonia-free jewelry detergents: These are designed for metals and typically safe for silver. Look for labels like “silver-safe” or “for ultrasonic use.”
- Commercial ultrasonic cleaning solutions: Brands like iSonic, Branson, or Elma make concentrated cleaners formulated for silver. Just make sure the product explicitly mentions silver compatibility.
A common DIY mixture recommended by jewelers:
- 200 ml distilled water
- 1 teaspoon baking soda
- 2 drops of non-scented dish soap (like Seventh Generation Free & Clear)
- Optional: 1 drop of hydrogen peroxide for light stain brightening
Mix gently and avoid foaming. Use warm—not hot—water for best cavitation performance.
Ultimately, the solution you choose should balance cleaning power with material safety. If in doubt, test it on a less visible part of the item first—or consult your ultrasonic cleaner’s manual for approved agents.
How to Clean Silver in an Ultrasonic Cleaner (Step-by-Step)
You’ve got a beautifully tarnished piece of silverware or jewelry, your ultrasonic cleaner is ready, and you’re wondering what’s next. The process isn’t complicated—but doing it the right way makes all the difference between a gleaming result and a potential disaster.
Here’s how to safely and effectively clean silver in an ultrasonic cleaner.
Step 1: Inspect the Item
Before you do anything, examine the piece closely. Is it silver-plated or solid sterling? Are there glued-in stones, wooden parts, or decorative paint? Any damage, chips, or peeling plating? If the item includes delicate or questionable components, ultrasonic cleaning may not be the best option.
Step 2: Prepare the Solution
Fill your ultrasonic cleaner’s tank with distilled water, not tap. Add your chosen cleaning solution—ideally a silver-safe detergent, or a DIY mix with baking soda and a drop or two of mild soap. Use warm water, but avoid exceeding 40°C (104°F) to protect both silver and adhesives.
Step 3: Place the Silver Properly
If your cleaner has a basket, use it to suspend the item without touching the bottom of the tank. This avoids scratching and allows cavitation to reach all surfaces evenly. Place the silver in the bath carefully—don’t stack multiple items together, as they might rattle and scratch each other.
Step 4: Set Time and Cycle
For most silver items, a cleaning time of 2–5 minutes is sufficient. If the item is extremely tarnished, you can repeat the cycle after inspection, but avoid prolonged exposure. Some high-end cleaners offer sweep frequency or degas functions—if you have them, use them.
Step 5: Rinse Immediately
After cleaning, remove the silver and rinse it thoroughly under distilled water to remove any residual detergent or particles. Skipping this step can leave films or water spots, which dull the shine.
Step 6: Dry with Care
Use a soft, lint-free microfiber cloth to dry the piece. Avoid paper towels or tissue, which can scratch. If the item has fine detail, allow it to air dry completely before storage.
Repeat this process as needed, but avoid daily ultrasonic use. For regularly worn jewelry, once every 2–3 weeks is typically enough. For display silver or tableware, cleaning before use or on a seasonal basis keeps them looking pristine without overdoing it.
Common Misconceptions and Mistakes to Avoid
Ultrasonic cleaning seems simple on the surface. Plug in the unit, drop in your silver, and press go. But misunderstanding how the process works can lead to avoidable mistakes—some of which may ruin your favorite piece.
Let’s clear up some common myths:
Myth: Ultrasonic cleaning removes all tarnish.
Not exactly. It removes light surface tarnish, oils, and grime—but for deep black sulfide layers, it needs help. That’s why the right cleaning solution matters.
Myth: All silver is safe in an ultrasonic bath.
Some silver items are plated, some are decorated with glue-mounted elements, and others are combined with fragile materials. These require caution, and some shouldn’t be cleaned ultrasonically at all.
Myth: The longer the cleaning cycle, the better the result.
Overexposure to ultrasonic energy can wear down silver-plated items or heat up the bath to unsafe levels. It’s better to run shorter cycles and inspect in between.
Myth: Any cleaner will do.
Household detergents, alcohol, or acids may seem harmless—but they can corrode silver, damage adhesives, or leave cloudy residue. Always use silver-safe or pH-neutral agents.
Also, a few practical errors to avoid:
- Stacking items in the tank
- Touching the base of the tank (causes cavitation hotspots and scratches)
- Using tap water (causes spotting and interferes with cavitation)
- Skipping the rinse step
- Letting items air dry without blotting (especially in humid environments)
By avoiding these mistakes, you not only protect your silver—you get better results, more consistently, with less effort.
When You Should Avoid Ultrasonic Cleaning for Silver
As versatile and effective as ultrasonic cleaning is, it’s not right for every silver item. In fact, using it in the wrong context can cause irreversible damage—especially with heirlooms, mixed materials, or structurally compromised pieces.
Let’s start with glued components. Many vintage silver pieces—especially jewelry—contain epoxy or adhesive-mounted stones, such as pearls, turquoise, coral, or onyx. The vibration and heat from ultrasonic cleaning can weaken or dissolve these adhesives, causing stones to loosen or fall out. Pearls, in particular, are extremely sensitive to ultrasonic energy and should never be cleaned this way.
Then there are composite items, like silver combined with wood, leather, bone, enamel, or shell. These natural materials may absorb moisture, crack under vibration, or discolor permanently. A silver-handled knife with a wooden grip or a silver pendant with an enamel inlay is better off cleaned by hand.
Be especially careful with silver-plated objects, especially if they’re antique or show signs of wear. Ultrasonic cavitation can lift or flake already-weak plating. If you’re unsure whether an item is plated or solid sterling, do a simple magnet test (silver is not magnetic), or consult a jeweler before cleaning.
Finally, avoid ultrasonic cleaning for artistic or oxidized silver that features deliberate patinas or darkened finishes. While ultrasonic waves won’t chemically alter patina, they can disrupt the uniform appearance—especially when used with baking soda or strong solutions.
In short, when in doubt—don’t drop it in. It’s better to gently clean a questionable item by hand than risk damage through a machine.
Comparing Ultrasonic Cleaning to Other Silver Care Methods
If ultrasonic cleaning is one method, how does it stack up against traditional silver care approaches?
Polishing cloths are a common go-to. They’re portable, easy to use, and excellent for spot-cleaning. But they don’t reach into crevices, and over time, repeated rubbing wears down silver, especially plated surfaces.
Chemical dips are fast and effective at dissolving tarnish—especially for heavily oxidized items. However, many dips contain strong acids, sulfites, or thiourea, which are harmful if misused and can strip decorative finishes or soft solder. They also produce unpleasant fumes and leave chemical residues.
Foil-and-baking soda baths are a gentler DIY option. They reverse tarnish through an electrochemical reaction, but they’re messy, not always consistent, and still don’t remove dirt or grease.
Compared to these, ultrasonic cleaning offers a powerful hybrid: gentle, contactless cleaning with mechanical precision. It doesn’t chemically change the metal, and it doesn’t rely on friction. It works well on detailed, textured, or hollow items, and it integrates seamlessly with other methods—like pre-cleaning before a dip or finishing off after polishing.
It’s not the only method. But for many users, it’s the easiest, safest way to keep silver clean—especially when used regularly as part of a maintenance routine.
A Gentle Technology for a Precious Metal
Silver carries more than just monetary value—it carries stories. A grandmother’s silver tea set. A hand-engraved wedding band. A piece of cultural craftsmanship passed down generations. These items deserve care that preserves both form and meaning.
Ultrasonic cleaning isn’t a replacement for heritage methods—but it is a leap forward in convenience and preservation. It protects details, saves labor, and fits into modern routines without harsh chemicals or aggressive scrubbing.
In a world where time is scarce and quality matters more than ever, ultrasonic cleaners offer a small but meaningful improvement to how we care for what we treasure. Whether you’re a jewelry enthusiast, a silversmith, or someone with a drawer of forgotten heirlooms, this technology offers a cleaner, safer path to restoration.
It doesn’t just polish silver. It preserves it.